A journal following the history, design, construction and operation of Bernard Kempinski's O Scale model railroad depicting the U. S. Military Railroad (USMRR) Aquia-Falmouth line in 1863, and other model railroad projects.
©Bernard Kempinski All text and images, except as noted, on this blog are copyrighted by the author and may not be used without permission.
-----------------------------------------------------------------------------------------------------------------------------------------------------------------

May 28, 2014

Depth of Field in Macro Focus Range Videos

A recent discussion on the Prototype Railroad Modeling Yahoo Group got me wondering about the effects of f-stop on depth of field when shooting videos in macro focus ranges. I made this short video to investigate how the sharpness varied at three different f-stops, f4, f22 and f29. I shot all using a Canon 70D, with 48mm focal length at the minimum focus distance.

I used a scene on my 00/009 Scale WWI layout, as it was already set up for lights and camera.  The camera was about 6 inches from the layout edge with the 18-135mm zoom. If you want to read more, I included an updated discussion of aperture and depth of field below the video. I recommend you watch in HD so you can see the effects of the parameters better. Note this is a new upload, the original upload did not allow HD. This one does.


Depth of field is probably the single most important parameter in model railroad photography. It is also important in model railroad videography. It is useful to understand why.

Two primary factors affect depth of field, aperture and focus distance in model railroad photography. A third factor, image format, is fixed by the type of camera you use. If are you comparing across different film or sensor  formats it usually means that the same image framing or composition will be at different focus distances.

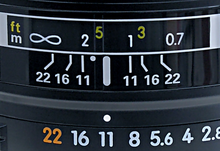
The brackets in the middle row of
numbers represent the depth
of field for each f stop of this lens.
(source Wikipedia)
When we a photograph a prototype railroad scene with a locomotive, we usually need to stand well back from the subject to make sure that it can be fully captured in the frame. As the focus point of the subject moves away from the camera the effective depth of field increases. Most DSLR camera lenses have a scale engraved on the lens body to show how the depth of field changes with aperture and focus (see image at left from wikipedia). Eventually the focus point reaches the hyperfocal distance, the point of focus where everything from half that distance to infinity falls within the depth of field. Usually prototype rail photographs have the subject and background scenery in the hyperfocal region. The bottom line effect is that most of the scene is in sharp focus.

If we attempt replicate the same composition in a model railroad setting, we find that we are not in the hyperfocal region. In model railroad photography and videography depth of field is only a few inches deep. It is a property of camera lenses that the depth of field region shrinks as the focus point moves closer to the camera. This region shrinks faster than the scale distance diminishes. Therefore, not all of the image will be in sharp focus. This is particularly severe in N scale models because the camera must typically be placed very close to the models to replicate a prototype shot, such as a three quarters trackside view of a passing train.

The shallow depth of field one gets at these macro distances makes even the most realistic scenes look like miniatures. Furthermore, prototype scenes can be make to look like miniatures by manipulating the  depth of field either in post production  or with tilt shift lenses. For example see this tutorial on Vimeo


The Sandpit from Sam O'Hare on Vimeo.


To increase depth of field to simulate the hyperfocal region we use as small an aperture (also called f-stops) as possible since the smaller the aperture size - the greater the depth of field. Pinhole lenses were popular because the small aperture of the pinhole allowed for great depth of field. Unfortunately, pinhole lenses were hard to come by, tricky to make and difficult to use because of the dark image in the viewfinder. Tilt shift lenses tend to not be useful in model railroad photography because the tilts, swings, and shifts needed to frame a typical model railroad image are too extreme for the hardware.

Furthermore, there is a limit to the sharpness obtainable from small apertures. There is a point where the aperture gets so small that the light diffracts as it passes through the hole and the overall image loses sharpness.

It is the size of the aperture that governs depth of field. Aperture sizes associated with an f-stop vary from camera lens to camera lens. In other words, f22 on one camera may not have the same size aperture as f22 on another.

To understand the process requires the use of the simple formula, f-stop (N) equals lens focal length (f_l) divided by the actual aperture size (D), N = f_l/D.

The table below shows aperture sizes for the two cameras that I have tested. You can see that the Canon Rebel XT at f29 and 27mm focal length has the smallest aperture at 0.931 mm, and therefore greater depth of field than the 50mm macro lens at f32.

f-Stop
Lens focal length (mm)
Aperture diameter (mm)
Camera –Lens Combination
32
50
1.563
Canon 5D with 50mm macro lens
29
27
0.931
Rebel XT with kit zoom lens

You can compute the aperture size for your camera by applying the formula. Be careful in comparing lens and f-stops as some manufacturers report equivalent focal length when describing their lenses and not the actual focal length, especially for the compact digital cameras. The equivalent focal length is the comparable focal length for a "conventional" 35mm film camera lens.

The recent arrival of focus stacking software  changes the calculus of depth of field for still images. Although the optical properties of the individual images do not change, focus stacking  post image processing of multiple exposures with different focus points to construct an image that is sharp all over. When used in model railroad applications, focus stacking allows us to create model railroad images that simulate the hyperfocal sharpness of a prototype image. I have found my macro lens very useful when combined with focus stacking. The ability of the macro lens to focus just an inch or so in front of the lens means that I can capture images where virtually the whole image is sharp, from immediate foreground to distant background

However, in videography, focus stacking is not an option. So we are back to shooting at small apertures. But, the problem arises that with small f stops, you need to slow the shutter speed to let in enough light. But, you can not use long time exposures in videography. If you are limited to 1/30th of a second exposure or faster, then you will need to either bump up the ISO or add more light. My Canon 70D can go over 51,000 ISO, but noise increases as the higher ISOs. I used 2000 ISO  in the video above and it shows acceptable results.

A better solution is to add more light. One 700W flood is usually enough for a small scene. Bigger scenes will require more light. But then you can shoot at wider f stops as you are unlikely to need to be in so close, so depth of field increases. Lighting is an important subject  and deserves its own discussion. But understanding the basic physics and performance of your lenses is important too.

Videography is much more complex than still photography. Many of the techniques needed for good model railroad photography still apply, but they are insufficient to insure you have a good video. This will be a topic I revisit in  upcoming blog posts.


May 26, 2014

Rail Fanning Port of Los Angeles

BNSF engines shuffling steel skeleton flats at Pasha Stevedore Terminal on S Fries Ave.
AW and I were in Los Angeles last week to attend the graduation of one of my nieces. While there I had an opportunity to do some rail fanning one afternoon at the Port of Los Angeles. I was lucky because the area I was mostly interested in was very busy. When I first got to the Pasha Terminal on Fries Street, they were unloading brand new 53 ft empty containers from the GearBulk ship Finch Arrow. This is a special design ship optimized for special bulky cargo delivery.

Double barreled container ship action!
Next stop was the USS Iowa to check out the battleship and get photos of the Evergreen container terminal across the channel. The Ever Strong was being unloaded there. At about 4:45PM the container ship Spring R left the Yusen Container terminal and headed out to sea. As it went past and I was able to get a bunch of photos.


Leaving Terminal Island over the Badger Bridge.
From there I checked out the Alameda Corridor, especially where the railroad and the highway cross the Cerritos Channel.  In this area I saw 5 BNSF container trains heading to Terminal Island or leaving in about one half hour.  I saw a lots UP stuff further inland on the Corridor too, but I could not find a safe and good place to shoot them. In general, the trains at the port are very difficult to photograph as the security requirements due to terrorists, theft and smuggling have resulted in fences being installed every where. Since the area is relatively flat, fences are a big problem.
Fences in the way everywhere!

Light engine sets heading out to switch at night

Next I headed to Wilmington. I caught  two light power sets heading to the Pier A area. One came down Alameda Street and headed past Pier A to San Pedro. The other came down McFarland Ave and went to the Fries Street switch district. There it switched sorted and pulled steel skeleton cars at the Pasha Terminal.

I watched this for about an hour. By then the light was fading and I was hungry. Too much action to stop to eat.

Street Running - BNSF Heading out S Fries Ave to switch the industries and terminal
I was very happy to catch all the activity on S Fries Ave as I have selected that area for a future project. But more on that later as it develops. In the meantime here are some shots I got.


May 20, 2014

WWI layout

As part of the book I recently finished for Kalmbach Publishing, I built a small (3 by 6 feet) layout in 00/009 scale depicting the railroad activity leading up to the Battle of Cambrai.

Despite the horrific fighting, the European theater of WWI makes a compelling subject for a model railroad. An intense level of standard and narrow gauge railroad activity supporting the field armies presents many operational challenges, while the ruined villages and battle scarred trenches require a different kind of scenic treatment. This model railroad features the railroads of WWI before the Battle of Cambria in the fall of 1917. The first mass use of tanks and aircraft get most of the attention in historic accounts of the Battle of Cambrai, but the innovative offensive depended on extensive and carefully planned American railroad support.  The layout focuses on the 11th and 12th United States Engineers near the town Fins during the build up to the Battle of Cambrai.

For the rest of this fascinating story you will have to wait until January 2015, when the book is released. In the meantime check out this short video featuring the layout.

May 16, 2014

A Graphic for Marty

Marty McGuirk has a nice blog documenting the large HO scale layout he is building. This past week I have been helping him with a new design for his header graphic. Here are a couple designs.

The first design used a B&W image that I lifted from his blog and a clip art CV logo off the web. I colorized the image and applied a Photoshop poster edge filter to it. While it showed some design promise, Marty said the CV logo was incorrect and the the image was probably too tall.  He was also concerned that the milk car was too dominant, the hand rails on the gondola were cast-on and not separate add-ons (Marty is a freight car fanatic in case you don't know.) Try again. These pro bono clients can be so demanding!

 The next design is the same width but much shorter. He sent me a color image with a steam engine to use.  I added smoke, steam and a new sky. I applied the same filter as above. The logo is correct as  I drew the it directly from official CV documents.

Stop by Marty's blog and tell him if you like these.


May 13, 2014

Pole Line

Pole line from Potomac Creek to Stonemans Station.
I made a few more telegraph poles tonight.  I  also modified the existing poles by increasing the sharpness of the angle where the insulator pegs meet the poles and shortening the pegs a bit to better match the prototype photos.

I started to emplace the poles spacing them at 18 inches where the terrain allows. The lines and touch up paint are next.

The box car is a stand-in for the telegraph shed that will be made from a conductors car on blocks as seen in the prototype photo. I wonder if that stick leaning against the telegraph pole is a brace? If so, it can't be very strong.


The line of soldiers  in the background is inspired by this prototype photo showing a scene at Falmouth. BTW this is the only photo I have seen of Falmouth that shows the railroad.  Note the box cars up on rise in the background.


The Stonemans Station scene is close to being complete. The box car is a stand-in to check composition.

May 12, 2014

Wetmores Visit

Don is trying out my new smartphone tripod adapter
 from MeFoto while John and Gerry look on. Don got
some nice video of the Fury crossing the bridge.
 On Sunday Gerry Fitzgerald drove up from Charlottesville for a mini work session. He had been "jonesing" for a work session for a few months, so we finally scheduled one. He worked on making telephone poles for the telegraph line.  I need about 20 more to finish the line from Stoneman's to Aquia.

Two poles ready to plant with two insulators
per pole. (photo by Gerry)
I discovered quite by accident that the Tichy delrin wheel bearings have the right size and shape for O scale top hat insulators. Prior to that I was turning each insulator on the lathe. This saves a lot of time in the construction process.

We are using natural sticks for the poles, tooth picks for the wood standoffs and lycra thread from Berkshire Valley for the line. Gerry finished 6 poles on Sunday in between lunch and dinner.

In the meantime I worked on various little projects including priming a model for a client and the adding siding to the shed at Brooke.

Later that evening, Don and John Wetmore visited the layout. Don has a large HO layout depicting the 1960s in St Joseph, MO, called the St Joseph Terminal. He lives in Omaha, NE and is an employee of Union Pacific Railroad in the strategic planning group. Sounds like a great job for a model railroader. John in not a model railroader per se, but he does enjoy looking at them and he is interested in Civil war history. They have a great great grandfather that was bummer in the 13th Wisconsin Regiment and marched with Sherman through Georgia to North Carolina.

After snacking on a chocolate cake brought by Gerry from his favorite cake shop in Charlottesville, we headed down stairs. Don and John had a chance to run a train from Falmouth to Aquia. They had to drop to cars at Potomac Creek so they got to try out the couplers and brakes. Then we discussed the expansion plans and surveyed the potential right of way (through the closet and in the TV area). All three visitors endorsed the plan, but thought that the additional blob did not add much considering the cost of losing the "crew lounge." Finally, Don got some pictures of the layout and used new  Mefoto MPH100C Smart Phone Holder to get a short video of Fury hauling a short train across the bridge.

May 6, 2014

Plan for a life time layout

As usual, I caught a bug on the trip to Michigan last weekend. Air line flights always get me.  So while I am home sick, I started thinking about how could I expand this layout. This speculation was based on three main factors.

First is that I plan to start laying the track at Aquia Landing soon. That is the last section of track work in the current plan - the "light at the end of the tunnel." I saved it for last as I knew if I built the harbor part of the layout first, I would probably never have finished the the rest of it.  Essentially I saved the best for last. But, I always like to have a a carrot dangling in front of me. It is too depressing to think this is the end. To me layout planning and building is the best part of the hobby, model building, scenery, and operations next. Track laying, DCC and wiring are last.  So I was thinking about expansion.

Secondly, my wife is convinced that we are not going to move when we are retired, even though I am lobbying to move to a lower cost area.  I never win these debates.  So it looks like its, "Die in place," as we used to say in the Army. That means this will be my last basement I will have to work in.

Third, several of my model railroad friends have had to abandon their railroads as age related problems set in. Sad but inevitable. Might as well plan for that too. So how would I expand this to my lifetime layout?

Earlier, I drew potential expansion plans showing Alexandria, and Burnside Wharf as possible expansions.  The newest plans look at the other end of the railroad. They address the most troublesome  aspects about the current layout, notably the tight curves at the north end of Falmouth, including the turntable lead and to a lesser extent at Stoneman's Station.

The first phase would be to build a new Falmouth on a narrow shelf where the road show layout is now.  It would reside on top of a long set of custom bookshelves with room for a TV underneath.  Once the new Falmouth was built, the current Falmouth would be removed, and the tracks reconfigured to pass through the closet. Stoneman's Station would move to the current Falmouth location. The turnouts at current Stoneman's would be removed and it becomes a nice long stretch of single track. All the new curves are 30 inch minimum radius with easements.

The track section in the closet would be removable to allow access to storage when the layout is not running. There is room for it for fit. I used that closet for staging in an earlier N Scale layout.


The next phase is a bit more drastic as it repurposes the TV room to purely layout space. Not a big loss as I rarely watch TV. In this plan I would add a central blob adding about 27 feet of mainline run between Falmouth and Stoneman's.  The aisles would be fairly generous, but not enough room for a TV watching area.

The last major change not shown on these drawings involves rebuilding the Potomac Creek bridge to its full size, about 8 feet long. Yes, once the layout is expanded there is no compelling reason not to rebuild it. This would only be possible if I move Stoneman's Station. If Stoneman's stays where it is, then a bigger bridge would not work.

The obvious advantage of these plans is that there are longer runs between stations, an important factor in TT&TO operation. I plan another post soon about TT&TO as it will apply to this RR. This is an subject that I have been examining lately as I seriously plan for operations.

The track laying and wharf building in Aquia Landing should take about a year. Throw in another 6 months for freight car construction then operations can start. The ships and other structures will take perhaps another year.  That still leaves me about 2 years until retirement.  Plenty of time to think about this. Once this layout is maximally expanded, I do not plan another basement filling layout. Instead I would continue to build smaller projects until no longer able or take up another hobby.

In answer to Marty's comment, I added am image of the interior of the closet showing the split landing steps.  I keep my shop vac, photography lights, tripods and a lot of train stuff in here.  The landing step is 52 inches off the floor, just enough room to have a track at 48 inches below. Installing it will be a pain as there is another joist that will have to be cut on a angle, but it will fit.


ProRail 2014 and Dan Toomey Visits


Mike's layout combines great scenery, elegant design, prototype signals and operation
I operated the west end of Clifton Forge yard. My main duties
were weighing coal hoppers as they came in at this
work station. A seated job that was fun.
Last weekend I attended ProRail 2014. I had the chance to operate on three  HO scale layouts. The first was Mike Burgett's C&O James River Division depicting the 1960s in Virginia. It is an amazing layout with beautiful scenery and über-prototypical signal system.  Mike is a professional signal engineer for CN railway, but he has been working on RR signals since he was 19. Mike's layout has to rank in ten top 10 of all layouts I have visited. It is world class in every category, and beyond world class in some others.


Main yard on Buck's layout

A view down one of the aisles
Next I operated on Phil Buck's modern era UP layout set in Kansas City. The layout is just two years old, but is already fully operational. He and his helper Kevin (sorry, I forgot his last name)  plan to add a full signal system and then add a complete scenic treatment. It is a fun railroad to operate with a variety of jobs from unit sulphur and coal trains that I ran in the morning  to the Kansas City Terminal Switcher job, which I ran in the afternoon.


Part of Toledo harbor

Massive Jeep Plant
On the last day I operated on Doug Tagsold's latest layout, the Toledo Terminal. It is a very large depiction of the myriad railroads that operate in the Toledo area. I never realized that Toledo was such an important industrial city with a very busy port. It was the biggest coal destination on the C&O. Doug's layout includes ships, grain elevators, a steel mill, massive Jeep plant and lots of smaller industries. He built it in 4 years, but plans to tear it down and build a new narrow gauge layout. Amazing.


Monday, Dan Toomey, author of "The War Came by Train," and guest curator of the B&O Museum Civil War exhibit, visited the layout. He returned the models that were on loan, got a chance to inspect my various layouts and to discuss future projects for the museum. It was a fun visit.


I did a book review of Dan's book a few months ago. I really recommend it. It is a very good read.

Dan's great great grandfather was an engineer on the B&O during the war. So we agreed we would name one of the loco engineers on the layout Toomey.