A journal following the history, design, construction and operation of Bernard Kempinski's O Scale model railroad depicting the U. S. Military Railroad (USMRR) Aquia-Falmouth line in 1863, and other model railroad projects.
©Bernard Kempinski All text and images, except as noted, on this blog are copyrighted by the author and may not be used without permission.
-----------------------------------------------------------------------------------------------------------------------------------------------------------------

December 30, 2011

Layout Visitors and Prototype Rails

 Work progresses, but it's too messy to show to the public. In between slinging plaster and making a huge mess, I had some very nice visitors this past week.

John Drye points out some detail at Stoneman's Switch to his niece, Sarah.
Ben and Katrina, my niece and her boyfriend, check
out the layout on the day after Christmas.


Fred and Helen posing by Potomac Creek. Fred and I were fraternity bros at MIT. 
Next week I will be traveling down to Cocoa Beach to conduct two seminars. One on how to solder brass kits and the other will be a layout update on the USMRR Aquia Line. Here is a link to the clinic schedule. If you plan to be there, please stop by and say, "Hello."

December 26, 2011

Aquia Line - Layout Trailers


Coming soon to a basement near you.....


Once more, this time without using the iMovie template.


.... OK, but maybe if I stop playing with iMovie and my new iPhone 4S I will finish my layout.

December 25, 2011

Merry Christmas

Soldiers not actively campaigning celebrated Christmas in several ways. Union soldiers
would use salt pork and hardtack to decorate Christmas trees. Here workers from the railroad visit with soldiers to admire their tree.

December 24, 2011

Dirty Job 161


Where is Mike Rowe when you need him? I slung some water putty, white glue, and fast and final spackle on the layout tonight. The objective was to get the dam scene surrounded with basic scenery so I can paint it and then get the mill placed. Then final detailing can begin.


First I taped over the Easy DCC control panel with masking tape to keep glue and water putty off it.  I also taped over the tracks to keep the mess off them.


Then I  added a layer of rosin paper soaked in a 50-50 mix of white glue and water to the existing cardboard and rosin paper sections. These strips were to reinforce the paper and webbing at Dolkos-Weilepp Cut, which was a little loose.

Then I added a layer of heavy duty paper towels soaked in a soupy mixture of Durham's Water Putty, water and a heavy dash of white glue.

Once this is dry and the putty set, I'll check it for mistakes and glitches. I'll fix any problems and then add the base dirt layer.  The areas where the ditches touch the wood roadbed  will probably need some additional work.

On the areas where I had a pink foam base, I used fast and final lightweight spackle to fill in voids and correct the terrain shape. Lightweight spackle works very well will the extruded foam.

December 22, 2011

Water Wheel of Fortune

Work continues on the mill. I finished the basic structure except for the roof, a few doors and some hatches that must wait until I install the wheel.

Near finished mill with tail race extension installed. I still
need to paint the stones, add the roof and some other details.


Water wheel with NBWs installed. I used a half- inch
wood dowel for an axle. 
I laser cut the parts for the wheel and on the second try got a design that worked. I went with a 16 foot wheel (4 inches in O Scale), which is close to the wheel in the photos of Piney Branch Mill.  The size of the wheel required an extension of the foundation. I kind of expected that, so it was no big deal. I didn't spend too much time cleaning up the seams as it will be nearly impossible to see once the mill is installed.


There was a lot of trial fitting, trimming scenery and mocking up to fit the dam. Once I was happy with the layout, I installed it with hot glue.  I made the dam 5 inches tall so that it hides the seam in the back drop. That solves that problem.

I cut sheets of Plastruct G-Scale Dressed Stone sheet to cover  the dam, spillway, and head race opening.

I roughly followed the arrangement of the dam and head race with wooden sluice from the Yates Mill.  It works well in this location. This  web site  has some good photos of Yates Mill, as well as hundreds of other mills around the world.


Laying out the dam and spillway.
I masked off the backdrop and gave the dam a base coat of desert tan. I'll have to paint the final colors  in situ.


The dam is now covered with stone. The wheel and head race opening line up.
After thinking about this, I decided to add an extension on the left of the
head race to separate it from the spill way.


Spillway and head race now separated by a stone extension. The spillway
should probably be bigger, but I am limited by the overall width
of the valley.  I'll probably add a diversion pipe to the
dam at the base.  Some photos of Yates Mill show such a pipe. It
would be used during floods to increase flow to prevent overtopping the spillway.


This is the view from the operators' aisle.  The roof is temporary.


December 21, 2011

Going with Option 3 for the Water Mill

The view shows the wheel and dam, but is not the normal viewing angle from the aisle.

I started building the mill structure and have it about one third complete. Before I went any further I decided to see how it was going to fit in the scene.

I decided to go with option 3, i.e. having the mill against the backdrop with the dam hiding the seam where the creek meets the wall. The Yates Mill in North  Carolina is inspiration for this installation. This has the creek flow in the wrong direction in relation to the proper flow of prototype Accokeek Creek, but looks the most practical. The dam will help hide the place on the backdrop where I had to add an extension.
View from the aisle

December 19, 2011

A Milestone Achieved


This weekend marks a milestone for the Aquia Line. All major construction and terrain forming is complete. I can put away the chop saw for "good."


Dave Cooper had the distinction of running the first train
from Falmouth to Aquia under the new fully covered
mountain. Everything worked as planned....YES!
I also finished all the basic terrain shapes for the complete layout. There is still a lot of detailing and scenic work to do, but the benchwork,  scenic risers, and fascia is done. I still need to install some wainscoting panels under Brooke and Falmouth as the final finishing, but that will come later. My plan is to get the area from Brooke to Falmouth at least basically detailed and most structures built before moving on to Aquia Landing. By then I hope to be converted to battery power and I won't have to worry about wiring the tracks in the Landing area.

Bayo inspecting the regiment of troops that will be
marching through the Potomac Creek Scene

Rainer Kurth is a little too tall for my valance panels.

I had several visitors this weekend. On Saturday Adebayo Adedeji stopped by to check out the layout and see the laser cutter in action. Bayo is a PhD economist who works with me at the CBO. On Sunday Ranier Kurth and Dave Cooper visited. Rainer is an N Scale modeler from Switzerland who frequently travels to the US to see model train events. He is a true "American-o-phile." Back home he drives a 1978 Pontiac Bonneville and models the US railroads on his N scale modules. Dave is a local HO modeler currently working on a urban layout section that he plans to use in a larger layout.


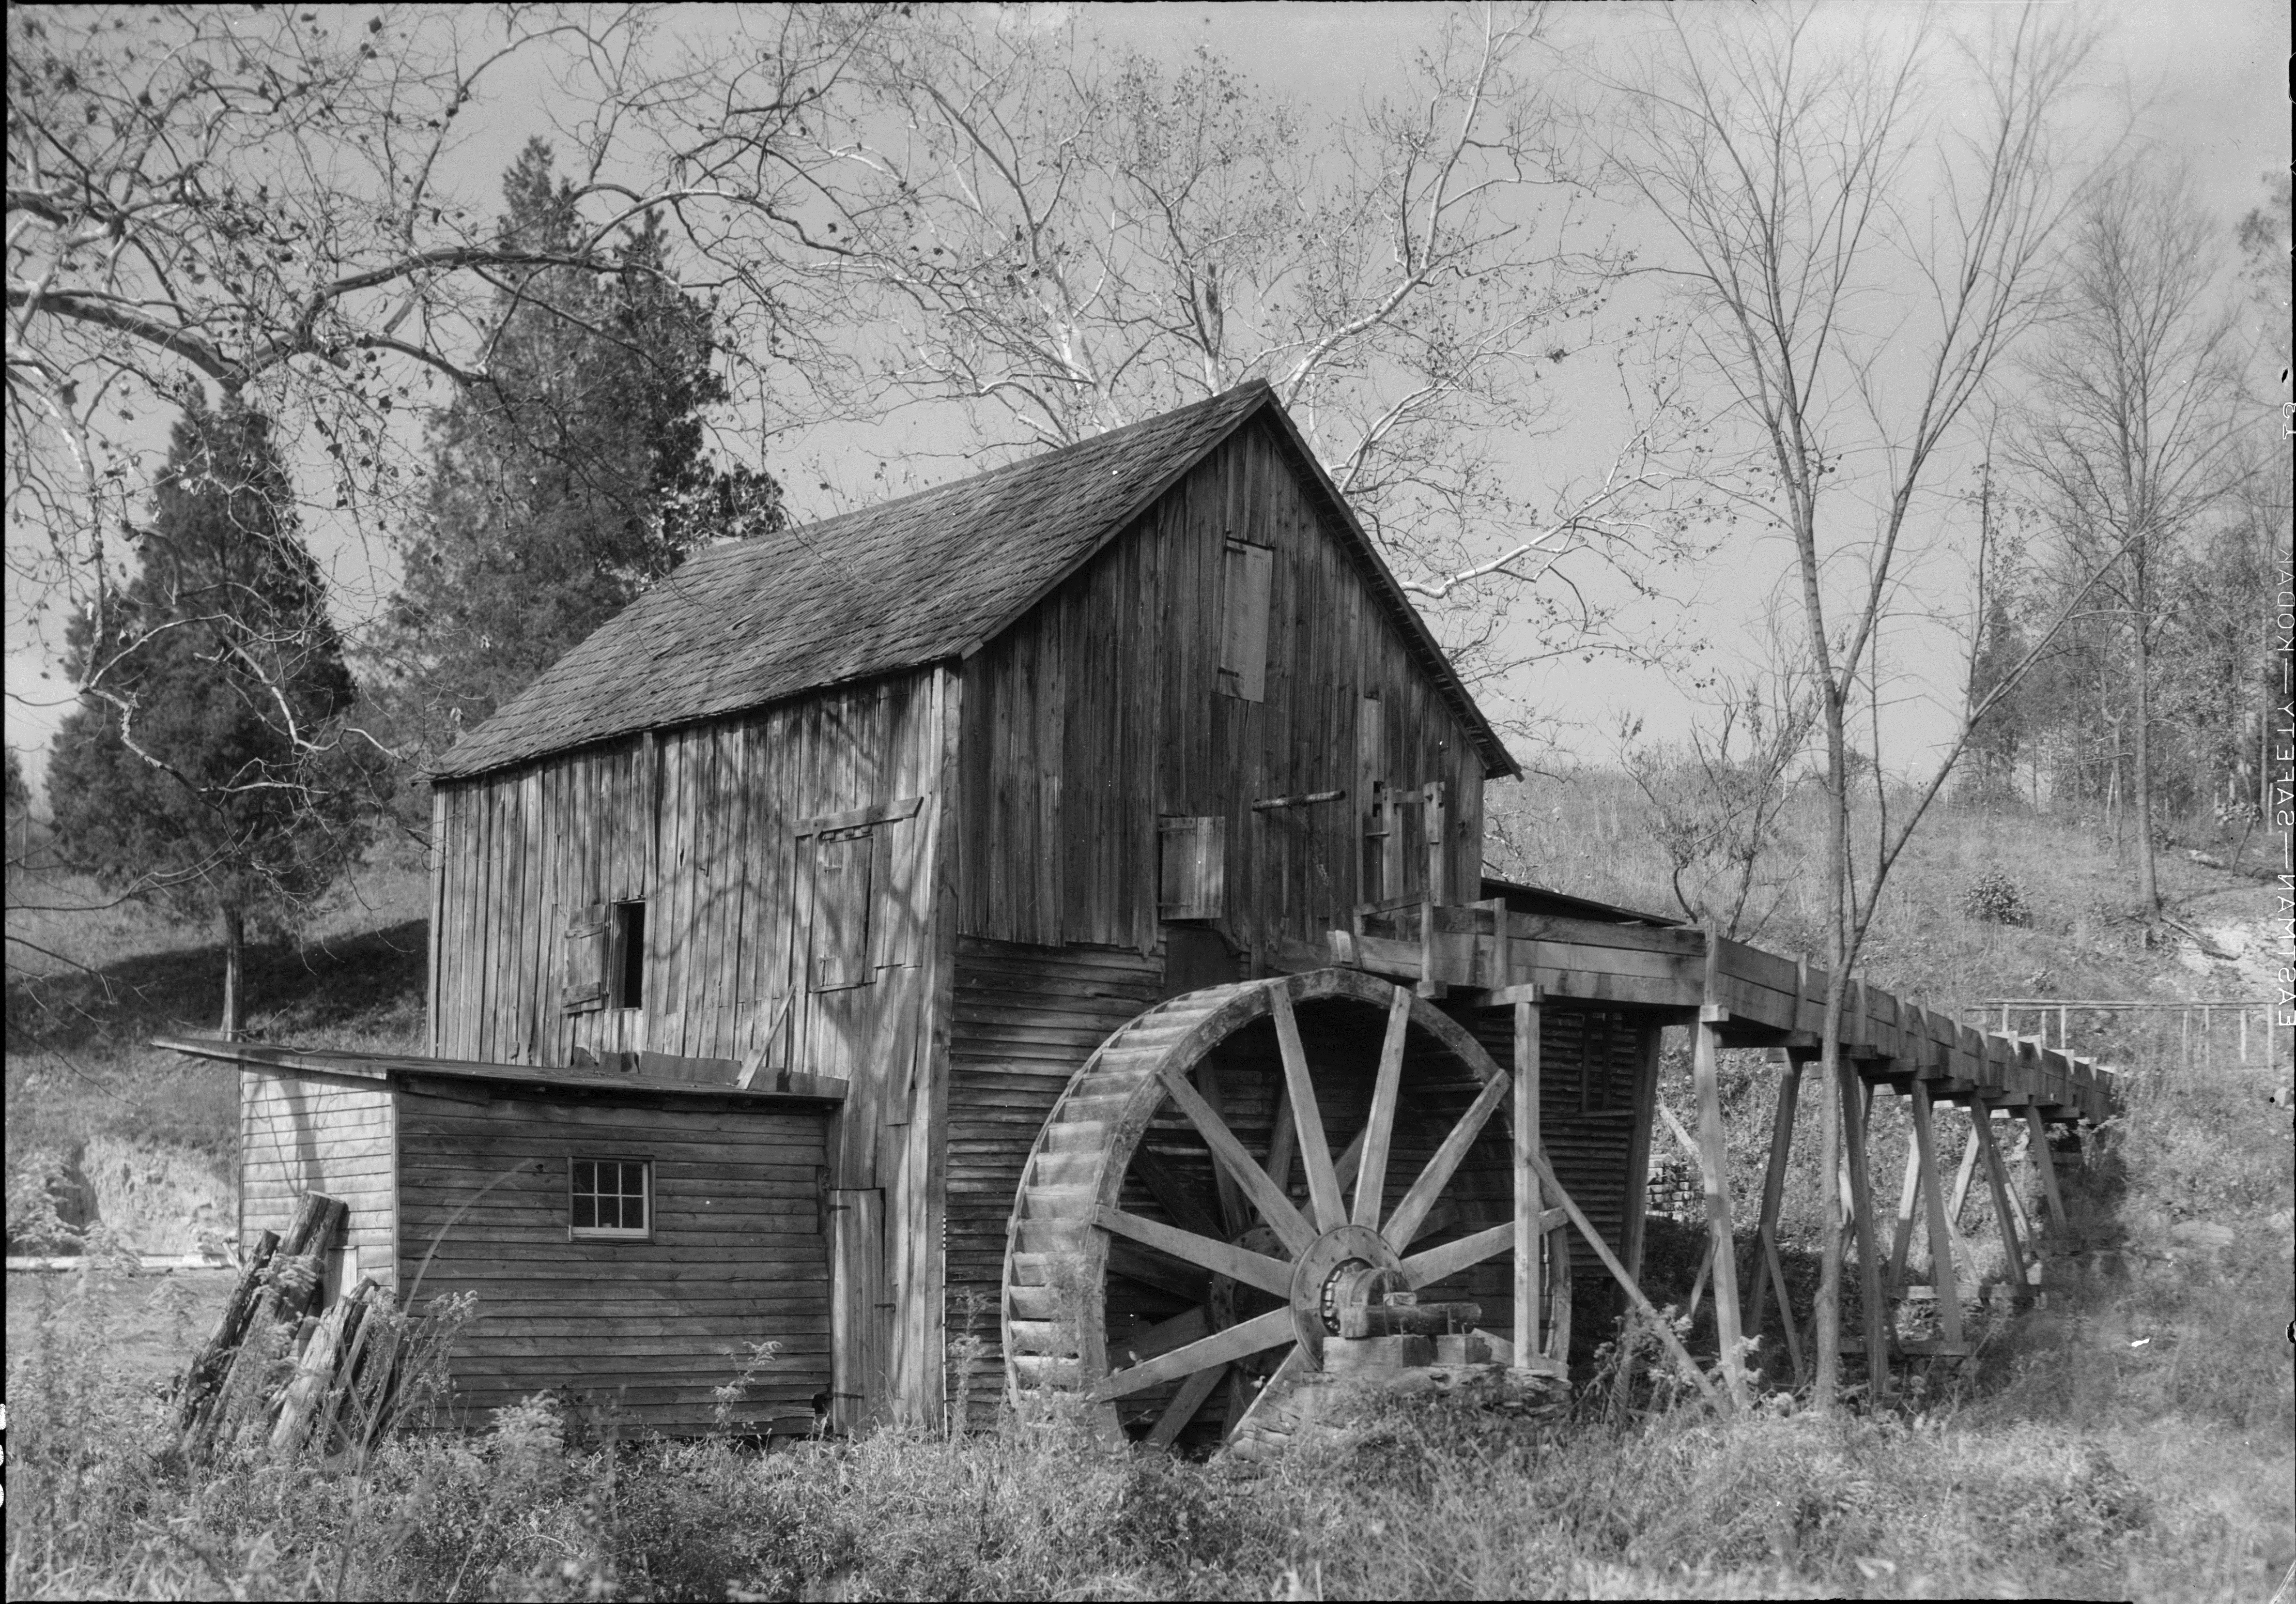
I also started building the water mill for the layout. I made the basic core out of laser cut 1/8th in plywood. The siding and stones will be overlays. The interior will not be detailed as it will nearly impossible to see inside once it is installed on the layout.

Trying to figure out the best arrangement of the hydraulic feeders to the water wheel is proving a challenge. I am still leaning toward option 2 from the earlier post, in spite of Gerry's vote for option 1.  The size of the water wheel will dictate things. The prototype had an overshot wheel, which  requires the most vertical drop. Wikipedia says, "Overshot wheels demand exact engineering and significant head, which usually means significant investment in constructing a dam, millpond and waterways. Sometimes the final approach of the water to the wheel is along a lengthy flume or penstock." 
I am experiencing this first hand.

Dave Emery's suggestion to use an undershot wheel would solve the problem, but undershot wheels are not appropriate for this locale. A comprise would be to use a breast shot wheel where the water comes in to the wheel at the height of the axle.

I learned that this mill is still standing and visible from a public road in Fairfax County.
Here is a recent photo. I don't think it was this heavily weathered during the ACW.

December 16, 2011

Back to the future

Last week I mentioned that I had received the Model Railroader 75-year collection DVD set. I had trouble getting the disks to install on my iMac, but after two calls to Kalmbach Customer Service, a replacement set of disks, which were probably unnecessary, purchasing an upgrade to my Max OS, which was also unnecessary and not suggested by Kalmbach, and a software patch that Kalmbach emailed to me, I was able to get the disks to load.

Wow, I am glad I did. Going back 75 years makes me realize what a rich history this hobby has. I am frequently surprised at how sophisticated these early model railroaders were. They also were not afraid to scratch build. An article from a soldier stationed in Central America during WWII describes how he made a locomotive using watch springs,  a home made soldering iron and a hammer and scrap metal. Never will I complain again about having to scratch build things. Actually I like scratch building and rarely complain about it.

Now read this passage from MR and guess what year it was written.  Hint, it is not Tony Koester's latest Trains of Thought column or an Ian Rice design book, but it is every bit as sophisticated.


The compilation of all the plans that MR published alone makes this set worthwhile. But I am really enjoying the old issues too. By the way, the excerpt was written by C.R. Garbett in an article called "Stage Set Scenery", December 1938.


Speaking of the future, Duncan McCree, of Frog Juicer fame, sent me this youtube clip. He filmed it at the Dead Rails Society.


December 15, 2011

Nice Backdrop Painting and Models

The 2012 Wigan Model Railway Exhibition in Yorkshire, England featured some awesome layouts. You can find a nice summary of them here. I am a big fan of British exhibition style layouts and want to build one or two myself, once I get the Aquia line finished.

What is a exhibition layout? I could not find an simple definition on the net, but I define it as a small, portable, self-contained model railway designed to operate with a public audience. In the United Kingdom a tradition has developed where trains shows invite layouts to display at their exhibitions. The shows pay the layout owners to bring their layouts and usually cover their expenses. In return, the shows charge an admission fee which can be up to $20 US. Only the best get invited so the quality of the work is usually quite high.

This is rarely done in the US. In most US train shows the layouts are displayed by volunteers without recompense. Some shows actually charge the layout owners a fee to cover insurance. The US attitude is more come one, come all, and run-what-you-brung. As a result some of the work you see displayed at US trains shows can vary widely, from contest quality modeling to cotton ball tornados wiping out a cartoon town.

The thing I find attractive about the exhibition style layout is the manageable scope allows for a high level of execution.  Many have self contained lighting and theatrical stage-type presentations. They can be little jewels of craftsmanship. However, these are not just static dioramas but operating model railways.

The Eaton Gomery layout by Peter Thomas has a particularly nice backdrop. This was done in 1:76th scale.

December 14, 2011

Mill Mock Up

Using the plans of the Piney Branch Mill I made a 1/48th scale mock up of the Piney Branch Mill building. I was pleasantly surprised to learn that the building in 1/48th scale is only 8.6 inches long. That will fit in the site nicely.

I tried various placements of the mill. The problem is that this mill has a large wheel and requires quite a bit of vertical drop for the feed water (hydraulic engineers call this head). If I install it as the first mock-up photo below shows, I'll probably have to make the wheel smaller than the prototype to allow for less available head.

Why is the head constrained? Because the water will back up from the dam and pass under the railroad embankment. Water gets to the dam by flowing through the culvert. The higher the dam the bigger the culvert. But, the culvert needs a certain amount of overburden to be realistic. Overburden is the amount of dirt between the top of the culvert arch and the tracks.
View from further back showing culvert in foreground under railroad embankment
Another solution would be to have the dam up stream of the tracks. The water could run to the mill in a race a couple inches up on the bank of Accokeek Creek. It would pass under the railroad tracks in its own small stone culvert. I have seen many mill plans on the HAER site where mill races ran for thousands of feet, so this is not unrealistic. There would be no dam downstream of the railroad tracks. This is my preferred solution at this point. But.....

In this design, the dam is wellupstream of the railroad tracks. The water reaches the mill via a stone and wood race.

Finally, the easiest solution is to reverse the flow of the river and have feed race and dam on the backdrop or hidden by the building. It would be a simpler scene.


I had planned to use this stone culvert on the Virginia Central near Afton built before the civil war as the prototype inspiration for the stone culvert.

Tunnel Cut Construction

Gerry sent me some photos from Sunday's work session. His set of photos shows a nice sequence of how I did the tunnel portal area.
Using foam to frame in the cut leading to the tunnel portal.


The surgeon at work.


Note to self, don't pull hot glue that sticks to your skin off.


The Great Cover Up

There are no missing 18 minutes here....
It's not pretty, but it works.
I spent a few hours tonight covering up the ridge behind Brooke. The deep scene areas were not as bad to access as I feared. I used a step stool and was able to reach all spots. I was surprised how sturdy the cardboard web was, especially after I added a few vertical supports underneath.

This cover is just the first layer of paper. Next will be a another layer with paper soaked in white glue. The final layer will be paper soaked in Durhams water putty, white glue and dirt. This was a very inexpensive way to make such a huge hill. Trying to do this with foam and plaster cloth would have cost a couple hundred dollars. I used about $12 in hot glue and about $3 in paper. The cardboard webs were recycled  boxes.

Marty stopped by to glue in a small piece of foam (which promptly fell off), eat dinner and take off. Oh yeah, he dropped off a cool present for me. I'll get a shot of it later.


Adding the paper layer over the cardboard web

An overview of Brooke, The tunnel is to the left. The brown paper is almost dirt color.
With the terrain covering the light sources, the tunnel is getting appropriately dark. The structures are just
there for ideas. The actual layout is not final yet.


 At the end of the evening, I mocked up a structure to represent the planned water mill at the deep end of Accokeek. I am using the mill at Piney Branch, VA for a prototype guide.  The plans are available at the HAER. It is a cool mill with some good civil war history as both Union and Rebel troops occupied it during the war. It's not too far from my modeled area.

The issue really is that the mill scene works best with the creek flowing out of the wall. But the creek should be flowing into the wall.  Hmmmm...... what to do.
Mocking up the Mill scene. The mill will be in a smaller scale, about 1/60th. Now, which way should the water run?

December 11, 2011

It's a small world department

This was a weekend of unexpected guests and lots of work on the railroad.

Andrew running a train across the bridge.
On Saturday Andrew Evans and his mother, Elaine Evans, stopped by to visit the layout. Elaine is the landscape architect working with Alicia on the backyard landscape design and construction. Andrew is a professional BBQ chef that also is a suppressed model train enthusiast, among many other hobbies including large scale model rockets. He owns a BBQ restaurant in Easton, MD. He used to compete and judge professional BBQ contests and knows Dave Frary from IQ BBQ. He really enjoyed the layout. I offered to trade layout work for BBQ so we'll have to keep an eye on that.


On Sunday Doug and Gerry arrived for a work session. We also were graced with a surprise visit by Paul Dolkos and John King.  John lives in Boyds, MD and models the B&O in Winchester, VA in the 1950s. His layout was in MRP 2005.


Doug and Gerry hard at work putting their Harvard and MIT Post doc education to work.
Doug worked on the terrain on the south end of Brooke by Accokeek Creek. He spent a good deal of time trying to get the terrain contours "just" right. Gerry preferred to spike rail and he completed about 8 linear feet of spiking.  I worked on the tunnel portal area of the Brooke.
Testing clearances of the rock cut
Doug worked on the terrain at Brooke.
The sloped piece is to get a feel
for the original slope.


After my visitors left, I got a burst of energy and finished up the flat terrain along the Brooke scene. I cut a piece of hardboard to trim out the cut that Doug worked on. I glued it in and then spackled it off. Once that dries, I sand it and the rest of the fascia and give another coat.  That should do it for fascia.

This is an historic point in my layout history. This peninsula has been essentially unsceniced for the 9 years I have lived in this house.  It had supported three previous layouts but it never progressed past a plywood plain.

Testing out the look of the tunnel cut

Adding foam supports to help hold up the flat area.

Over view looking RR South at Brooke.

Gurin's Cut at Brooke

The hill behind Brooke helps hide the view of Falmouth from the far end
of the layout near Potomac Creek.

December 10, 2011

Central Vermont Backdrop

I visited Marty's layout last night to do some backdrop painting. The story of Marty's layout and how he converted a double deck to a single deck layout is contained on his blog    I posted a short video showing the backdrop with a bit of commentary. You can see it below. Marty has a fine layout in the making.

December 8, 2011

Decision Matrix - the 300th Post


A few years back I was having trouble deciding on what layout to build. I had a bunch of N Scale modules and was trying to build a double deck layout. I had all the bench work done, but in looking at it I knew something was wrong. So I took an idea from work and built a decision matrix to help me sort out my thinking. I published this in a article in Model Railroad Planning 2006. You can see a copy of it here. I have an archived copy of the former layout website here.

When I decided to stop building my DRGW Tennessee Pass layout, I redid the matrix and discovered that the C&O Mountain Sub layout actually fit my givens and druthers (G&D) better. That matrix wasn't published, but the C&O Mtn Sub scored a 103. I had become bored with the Tennessee Pass layout by then, so I welcomed the change and started building the C&O Mountain Sub layout using my existing modules as a start. That layout was in Great Model Railroads 2011.

I have already related how I decided to switch to the USMRR Aquia line earlier in the first posts to this blog. But I never did a design matrix for it. Yesterday, Marty McGuirk was cleaning out old emails and sent me a copy of the C&O Matrix with a jibe that I should tear out the USMRR and go back to the C&O since it had the highest rating. That got me thinking, how would the USMRR Aquia Line score on the matrix, using the same criteria.

So I redid the matrix comparing the USMRR to the three previous layouts I was building in this house. Turns out, the USMRR scored highly, but not as high as the C&O Mountain sub. But it soundly beat both of the DRGW layouts.

This doesn't mean I am going to tear out the USMRR layout. The matrix is a decision aid and not a hard and fast rule. One of the most useful things you can do with the matrix is a sensitivity study. That is where you vary your G&Ds and weightings to see what how things compare.

I scored the USMMR a 2 for manageable  instead of a three because the wiring and track are simple, but I have to scratch build it all. If I had scored it a 3 the USMRR would have come out on top. The USMRR has the best waterfront design of any layout I considered. The others don't have a waterfront, but there were other plans I considered that did, so it is not a goofy as it looks. 

 I gave the USMRR a high score on big steam, not because it has C&O 2-6-6-6 H-8s and K4s but because the SMR 4-4-0s are big, beautiful and sound great. If I threw in battery power (assuming it works) then I'd add points for manageable and big steam.  I gave the USMRR 3 points for prototype modeling because of the information available at the National Archive. I would never have such good data on the C&O, and I had even less on the DRGW.

I could also change the G&Ds. When I built the matrix I was mostly comparing N scale layouts to each other. I did not look at different scales. Thus, the opportunity for figure modeling that O scale provides was not even a consideration in N scale. If I were starting from scratch, I'd add a G&D for figure modeling and that would tip the USMRR to the top. I could also add a G&D for the military modeling tie in. But if I did that now people would say I was cooking the books like a good beltway bandit.

So, it was a fun exercise.

As to swapping prototypes again, given that I am 55 years old and this project will take another 5 years, I probably won't build another "lifetime" layout. My next layout projects will be smaller, similar to British exhibition layouts. Some subjects I want to pursue once the Aquia line is "done" include a 1920s era steel mill in HO or P48. I also am intrigued by the idea of a Russian Front WWII depot in P48 using US Lend Lease equipment as well as Russian motive power (see the movie "Ballad of a Soldier" for inspiration.) It would feature some of the cool Tamiya 1/48th scale armor models now coming out. It would include an urban scene, perhaps battle damaged.

I just noticed that this is the 300th post to the blog. Amazing. Congrats to those to you that have stuck it out with me this long.

December 5, 2011

The future of model railroad is .....


....here now.

Over the past few years as I have been working and test operating my layout, dealing with shorts,  dealing with dirty track, and having to engineer reverse loops and frog power, I thought, "when are we going to drop this archaic system and go to battery power?"

Well, the answer is now.

This weekend, in a discussion with Ted Pamperin, he alerted me to the availability of the Stanton Radio Cab DCC system with battery pack. I had looked at it a few months ago, but because the NWSL's web site, the company that is offering the system, was so hard to use with broken and circular links, I could not tell if it was for sale.  Now, I confirmed that it is for sale. Today I ordered a starter bundle with a lithium-polymer (li-po) battery system.


I plan to overlay this on my Easy DCC system and use the 15V from the DCC system as a trickle charge. If the radio-battery system works as advertised, I'll convert the whole fleet to radio-battery control. At that point, my Easy DCC system would be come a bit overkill, as all I would need is a 15V DC source on the rails. But I can keep it for use on my N Scale DCC equipment.

If you need convincing about this system, check out this video.


I think that this type of system, as it comes down in price and becomes ready installed will lead to a new revolution in model railroading. If I was a DCC manufacturer, I'd be looking into this.

I also received my Christmas present today, the Model Railroader 75-Year Collection DVD. This is another move toward the future. But in this case, it looks like the future must wait. My disks were damaged during shipping and they won't install. I called Kalmbach customer service and they are sending replacements. They said they had a lot of trouble with disks 1 and 2 in the way they are packaged in the case.  I hope the replacements work.

In a triple play, I also received a review copy of The Iron Way, by William Thomas. I'll post a full review once I read it. Thanks to Ivan Lett at the Yale University Press for the copy.

December 4, 2011

Inspection Trip to NJ Model Railroads

Sewell, WV on Ted Pamperin's layout
With the quiet that accompanies winter quarters on the Aquia Line, Pvt Martin McGuirk accompanied BG Kempinski on a two day inspection trip of the railroads in New Jersey. The objective of the trip was to visit various railroads to learn the latest techniques in railroad technology and design. The culmination of the trip was an operating session on Tony's Koester's Third Sub of the Nickel Plate Railroad  where we experienced the latest in Train Order and Time Table Operation.  All in all it was a great trip. We got to see 4 great layouts and operate on one of them.
Mike's shelf fascia under St Johnsberry

Our first stop was at Mike McNamara's Northern Kingdom Layout. Although situated in southern New Jersey, Mike models the area in and around St Johnsberry, VT. For more information about his layout see his blog. His layout set in the 1980s features beautiful fall scenery complemented by the colorful diesels of five different railroads. Mike builds a shelf into his fascia with clear pine creating a very pleasing "furniture" look to his benchwork. 


St Mary's Yard
(L to r) Marty, Perry, Tony
The next stop was at Perry Squire's 1920s era Pittsburgh and Shawmut line. This gorgeous railroad is set in the 1920s and features numerous prototypically correct steam engines, structures and layout design. Perry was recovering from shoulder surgery, but he graciously allowed us to visit.

The scene at the left is St Mary's yard on Perry's layout. This is as fine a scene as you will find on any model railroad. 

Ted and Marty by Sewell
Thurmond on Ted's Layout
Third stop was Ted Pamperin's C&O New River and Alleghany Subdivision layout. Ted set his layout in winter and his mountain scenery just nailed it. His version of Sewell is the best I have seem. He also has a great representation of Thurmond that incorporates the Loup Creek branch as an active Branch. This is very hard to do, but Ted's design accomplishes it. As a bonus, Ted's layout features an upper level that models the Mann's Creek narrow gauge RR.

Tony briefs the crew at the start of the session.
Eric Hansman at one of the operator's stations
After a great dinner with Ted and Tony, Pvt McGuirk and I went to Tony's layout to get an hour long orientation and inspection.

On Sunday morning, after morning physical training (at least for me, Marty stayed in bed and watched "Hell on Wheels" on AMC), we met some of Tony's operating crew at the Andover diner for a big breakfast.

Then it was off to Tony's for an intense and enjoyable 4.5 hour long operating session.  Tony built the huge double deck design especially to allow his collection of NKP steam engines to reach speeds that are normally never seen on operating scale model railroads.  They didn't call it "High Speed Service" for nothing.

It was a toot operating the layout, literally, as the dozen or so grade crossings, meets and station required near constant use of the horns.

This is a layout of incredible scope and execution. It is amazing. We had 25 operators in Tony's basement and everybody was busy.  I always admire guys that take on such large projects and Tony is pulling it off.
That is Frankfort yard. Yes, it is about 60 feet long.
Marty proudly wearing his USMRR T Shirt

On our drive back to Virginia, we contemplated what we saw, heard and did. We had a great time. We both were re-energized to get our layouts going, confident that the layout choices we made for ourselves are just right. I look forward to a return trip to NJ in a few years to watch as these amazing layout progress.