A journal following the history, design, construction and operation of Bernard Kempinski's O Scale model railroad depicting the U. S. Military Railroad (USMRR) Aquia-Falmouth line in 1863, and other model railroad projects.
©Bernard Kempinski All text and images, except as noted, on this blog are copyrighted by the author and may not be used without permission.
-----------------------------------------------------------------------------------------------------------------------------------------------------------------
Showing posts with label Falmouth. Show all posts

January 27, 2023

Photos of Falmouth


The editor of the newsletter of the local division of the NMRA needed some photos of my layout to announce an open house. I thought that was a good excuse to shoot some new photos of the almost finished area near Falmouth. Focus stacked and sky replaced in PS.


September 26, 2022

HOOCHES


 I built three hooches for the camp scene at Falmouth. For the tent portions I used plastic tents by Reneda Models. I built the log portions and chimneys from wood dowels, balsa wood, pink foam, and wooden meat skewers.

I reserved the place in front of the hooch with the brick chimney for the soldier doing his laundry. Since I don't have a figure like that yet, I added him with photoshop. I will look for an appropriate figure, perhaps to 3D print.

Amby gave me some red Virginia  clay from his yard to use in the scenery. This is good stuff as there is no mica in it. But, you must grind it to a powder. Clumps of clay are impervious to water, that's why civil engineers use it for water barriers in dams and superfund sites, so it won't absorb the scenic wet water and glue. But once it is a powder, it works well and adds an authentic color. 


September 16, 2022

The Lone Pine Tree at Falmouth - new photo "found"


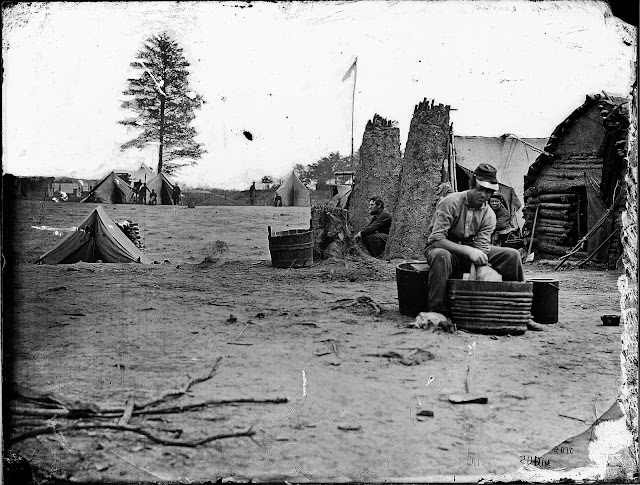
It is always a treat to find a new picture of the Aquia Line. That happened tonight as I was surfing the National Archive Website of Matthew Brady photos. and came across this photo. I was examining the picture when it occurred to me that the tree in this photo was very similar to the "famous" lone pine tree in the well know picture of an infantry company at Falmouth as shown below. 


The caption of the second  photo clearly states it is at Falmouth and we can see a line of box cars in the background. If you compare the lone pine and the tents in front in the two photos, you can verify that the location is the same.  So the second photo is also at Falmouth. 

The second photo gives me some additional ideas for detailing my Falmouth scene. I have no idea what the two mud columns are for but it will be fun to model them. The soldier doing his laundry is also a fun detail.

There is a bit of controversy on the identity of the unit in the second photo. The National Archives caption says the infantry company is from the 6th Maine. The 6th Maine was stationed at Falmouth at the time in question. However, others say it was 110th Pennsylvania. Thanks to General Hooker and his corps badges, we can trace this unit to the III Corps, as their badge was a diamond. You can see the diamond badge on the kepis of most of the soldiers in the photo.  The 110th PA was assigned to  2nd Brigade, 3rd Division, III Corps, Army of the Potomac, from Sept 1862 to  June 1863.  The 6th Maine Infantry was assigned to the Light Division, VI Army Corps from January 1863- to the end of the war. The  VI Corps badge was a cross. So we know this is a III Corps unit, probably the 110th PA as there were other photos taken of that unit around that time. 

VI Corps

III Corps

August 13, 2022

My wife was wrong...

I did use that piece of wood I was saving for 10 years just in case I needed it. But I'm getting ahead of myself.  I have been  laying and spiking track pretty diligently in the past few days. I now have all the turnouts and almost all the track installed. I just need to add one engine  storage track off the turntable and to replace the flex track on the bridge with hand laid track and I'll be done with track. Yes, there will still be several thousands spikes to go but the track will be useable.

The last turnout is installed 

With the track done, the next step was installing the turntable. I am reusing the turntable from the old Falmouth. I was able to disassemble it and save it. The trick was finding a place to fit in the new plan particularly to avoid the benchwork. I had to work around the Ikea legs and a joist that was screwed to those legs. I also did not want the electronics from the bottom of the turntable to interfere with the view of the TV under the benchwork. I decided to install the turntable at the far left end of the lead to the engine terminal. There will be just one storage track and that is a reverse move off  the turntable. That arrangement spreads the engine service facilities along the turntable lead. I think it looks good and allows me to access the turnout switch stands behind the turntable lead without interference from the water tank or workshops.  It also makes the run to the turntable longer. 

I knew the wood scraps would come in handy.

To use the existing turntable base I had to cut the plywood the turntable was formerly mounted on. This was tricky as the existing electronics for automatic reversing and hub for the turntable extended below the bottom of that piece of plywood. So I could not just place the base of the turntable on my MFT and cut away. Instead, I set up my saw horses and used some scraps of plywood that I have been saving for years for a job like this. They raised the plywood base off of the deck and allowed me to use my track saw to cut nice straight lines to trim it. I knew those wood pieces would come in handy!

Fitting the pit around the legs and joist limited
my choice of possible locations for the turntable.
Next I had to cut the hole in the existing plywood bench top for the turnable. I aligned everything as precisely as I could and drew lines for the center line of the track. I took care to avoid the Ikea legs under the table top. I drilled a half inch hole on the plywood table top to accept the turntable axle. Then I used the turntable spinning in that hole as a trammel to mark the circle necessary for the pit. I added a half inch to the radius to allow room for the wooden retaining wall. Then I used my Carvex saw with a fine blade to cut the circle. 

Instant turntable

 I had to notch one corner of the turntable base to fit around the Ikea legs, but the turntable popped right into place. Four screws pulled the turntable tight and secure. I must say it was gratifying seeing the turntable installed in the pit and even with some existing ground cover on the pit floor. 

I installed railroad ties around the pit wall to act as a retaining wall. The ties give the pit a rough and temporary look perfect for a military structure. 

I put a quick coat of paint on the fascia and its starting to look like something. The new Falmouth with its long sidings and greater track capacity should allow more involved  operations. Plus, I think it is going to look really cool.

The installed turntable, painted fascia and some ground cover looks good.


December 9, 2021

I'm ready for second breakfast

Mock up of the new engine terminal - very similar to the old version
Track laying continues on Falmouth. I decided to install the tracks from the rear to the front. So the stub siding to the freight house and most of the passing siding are now installed.  Two mroe turnouts to go.

I have also been rethinking the engine terminal. After several changes of mind, I am going back to what I originally planned, which is very similar to how I had it in the other room.

Meanwhile, I have been getting ready for the holidays. My niece is a Lord of the Rings fanatic, so may wife suggested a present that includes the hobbit meal times. The idea morphed into a clock that displays the meal times instead of the hours. I made it in my shop using the laser to cut some of the pieces. It was fun to make the hobbit home on top. 


March 19, 2021

It's back!

I am continue to lay the track at Falmouth. Tonight I installed most of the ties. 
I made a few adjustments to the track plan, including bringing back the infamous double slip stub switch.  Why? My operators just love it!  Plus, it actually will save some work as one switch stand can serve two turnouts.  It's odd to realize that there will only be 5 turnouts at Falmouth plus the turntable. 


The arrival track is long enough to comfortably hold a 10-car train and a engine. Now, to lay the rail and install the spikes. I hope I have enough.


March 13, 2021

Benchwork Completed for Layout Expansion

 I completed the benchwork for the layout expansion this evening. I thought I would do a video update so as to better show the extent of the completed section.

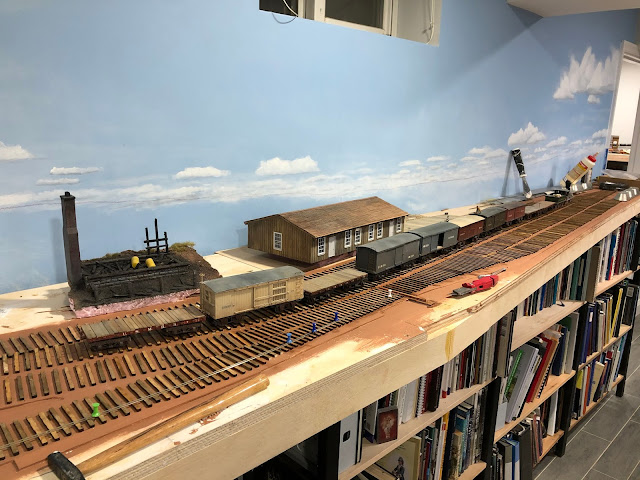
After I filmed the video, I put some cars and structures on the benchwork to get a feel for how the scene will look.


February 5, 2021

Layout Expansion - Phase 2 begins - and other news

 After several months of delay due to floods, hip surgery, and my mom's passing, I finally started Phase 2 of the expansion of the Aquia Line. Over the past few days I have been installing the benchwork for the new section. I decided to go with less ambitious plan of adding just Falmouth and not modifying Aquia Landing. This will allow me to get the railroad back in operation sooner. It leaves open the possibility of expanding the railroad later if I still feel the urge to build. I needed to reprioritize the timeline of the expansion over other projects, such as the locomotive build, as I have a dead line for an article coming up and I need to have some of this expansion done. 
Speaking of articles, please check out my latest piece in Model Railroad Planning 2021. In that article I discuss some ideas to designing backdrops for model railroads.


Back to the expansion, as you can see in the photos, the benchwork is very similar to what I built for the POLA layout. I ended up using only 12-inch deep Ikea IVAR shelves  under the layout as opposed to the deeper 19-inch ones I had under parts of POLA.


The second photo shows the expanded area available for new location for Falmouth. This new area is about double the length and wider than the old Falmouth. I wanted the area above the TV to be deep enough so that my operators would not bang their legs against the glass shelf of the TV stand below the benchwork. The wider layout space space also gives me more room for structures and scenery at Falmouth. 

One of my main concerns was the grade of the track coming out from under the stair landing. At a minimum, the tracks need to climb up to the top of the IVAR shelves. That requires an elevation gain of about 1 inch over 13 feet, less than one percent, to an elevation of 49 inches.

I wondered if I should make the height of the track at Falmouth the same as at Burnside Landing, which is 51 inches. The only reasons to do that are, first,  if I wanted to make a continuous run, which I don't, the tracks needed to be at the same level. The second reason is more subtle and relates to the prototype geography. The track at Falmouth should be higher than the track at Aquia Landing since Aquia Landing is at river level and Falmouth is higher on the ridge.  But, if I placed Falmouth 51 or higher inches, it would require climbing at least another 2 inches, resulting in about a 2.5% grade coming out of the closet. I was concerned that my engines would not be able to pull the design length trains up that grade.  So I opted to minimize the grade. Thus Falmouth will be about 2 inches lower than Brunside's Wharf and Aquia Landing.  The difference is hard to detect when you are standing at the layout.  We will have to chalk up this discontinuity in space-time continuum to the effects of traveling under a stair landing. Perhaps we can blame Harry Potter.

I am also reconsidering the scenic treatment of the section behind the couch. I designed a long low trestle in that spot. But I now think I would be better off breaking up that stretch of track into two discrete scenes. I think that might make the distance traveled seem longer if one can not see the whole train at one time. 

So I am looking at some combinations of bridges, cuts and fills in this area. Also, because of the book shelves under the layout, I don't have a lot of depth to exploit. One idea that appeals to me is to install a through truss bridge over a creek in this area (see photo below) . I built one several years ago for the road show layout, but Gerry has that now. I still have the laser drawings for it, so making another one would not be hard. That kind of bridge looks good in a low clearance application.


Today I presented a talk to the Osher Lifelong Learning Institute at American University about railroads of the Civil War. The talk seemed to have been well received. We have tentatively scheduled an open house so the OLLI members can visit my railroad and perhaps some other civil war sites in Alexandria.


May 8, 2020

Guest Post - Dufour's Memories

In May 1863, Mr.  Jules Ignace Mantel Dufour, an executive from the B&M Railroad visited the Aquia Line. He was on a weeks long tour of railroads on the east coast to see how the war was affecting them. It is curious that an executive from the B&M would visit Herman Haupt's railroad, as Haupt was currently engaged in a legal and financial fight with the B&M over the Hoosac Tunnel (It was actually the B&A, but work with me on this.)  Nonetheless, the visit was cordial and Mr J.I.M. Dufour actually picked up the tab for the dining out.  Mr Dufour brought a photographer with him, who took several wet plate images of the USMRR railroad. Alas the images were presumed lost.


Last month,  Jim Dufour, a descendant of J.I.M. Dufour, found the wet plate negatives in a chest in the family's barn. It's no coincidence that Jim Dufour is a B&M Modeler and also did a tour of east coast model railroads in 2019, including the Aquia Line. So Jim sent me copies of the images he found, after he expertly colorized them.


These rare images show the section of the Aquia Line that is currently under re-construction. They are photographic artifacts of what is now "history."

Jim also sent a copy of a video clip that he made of his own layout. The cinematography section of the USMRR Construction Corps did a little image enhancement work on the video as a proof of principle. You can see the before and after video below.


January 29, 2020

Surveyors Report is Encouraging

Survey crews use 30-inch curve templates to see if the plan will fit.


In preparation for rebuilding and expanding the layout, I sent out the survey crew to see if the latest plan could fit.  I case you forget, the plan under consideration is at the right.

The primary objectives of this plan are to increase the radius of the turn back curve at the entrance to the current Falmouth and to extend the layout into the crew lounge.  We also want to keep the Crew Lounge as open as possible without having to relocate the couch and TV.

Most of the other layout expansions I have considered make a 90 degree turn at Battery Schaefer and head directly under the stairs and into the crew lounge for simplicity's sake.  The area where Falmouth is now would not have any track.

It always bugged me that I was giving up that extra 10 feet of visible mainline run.  With only 120 feet in total of mainline, that is a big hit. So, the idea of this plan is to maximize the main line utilizing the wall where Falmouth is now. I would add a 180 degree 30-inch radius turn back curve at Battery Schaefer. The track would run across about 5 feet of tangent, and then enter Stares Tunnel by the room entrance via another 30-inch turn back curve. The half of the turn back curve in the closet would occupy a shelf before it went under the stairs and entered the crew lounge. (In the same general area where the staging yard to PoLA was, but with a much larger radius curve.) Crews could follow their train as it enters Stares Tunnel, pass through the door and then into the crew lounge.  The hidden run is a bit longer in this plan, but accessible over most of it.

New track with Photoshop scenery. The scene creates a pleasing "Ess" curve.
Will it work? Using a set of 30-inch curve templates I laid out the possible new alignment in the visible and hidden part of the layout. It all fits.  To make the turn back curve centered in the available  space, I would need to push the track about 2 inches to the top of the drawing and into space where Battery Schaefer is now. This means will have to re-lay the southern turnout at Stonemans.  That isn't too bad, as the siding at Stonemans would need to be lengthened to allow 10-12 car trains anyway.  And I want to increase the radii of the turns at that end of Stonemans too.

I would have to move the trestle at Clairborne Creek, or it could be replaced by a larger trestle across the aisle from where it is now, or both. More bridges are better.

There would be a 24-inch choke point in the aisle at the apex of the curve. Hopefully that won't be too much of an issue as the new section is just a through track and not a place where people need to work.

Once the layout enters the crew lounge, this plan has more open-country running on a narrow shelf. It omits the large trestle.  The trestle would require so much vertical depth that there would be no headroom under the benchwork for people on the couch. I would like to keep the couch where it is now.

The next step is to prefabricate the benchwork and roadbed for the track that would go in the closet and under the stairs. These would be installed in sections with precise Festool dominos for alignment. I plan to use Atlas O scale flex track on 3/4inch plywood for these sections. On top of the plywood I will add 1/8th-inch plywood with the track centerlines for curves and easements that will be laser engraved. By doing this,  I hope to to ensure that this track work is free of kinks and sharp easements. Once that is tested and is "bulletproof, I will install in place and begin the rest of the construction.


November 25, 2017

New Train Bulletin Sign at Falmouth

The laser cutting work station is complete and the laser is back in operation. The first task was to engrave a new train bulletin sign at Falmouth. The previous train bulletin was recycled from McCooks and showed trains Eastward and Westward. That caused some confusion for my boomer operators, so I made a new one showing Southward and Northward, the same as in the time table.

For material I used some left over masonite that was finished for chalkboards. Marty left some of this material here after I did a small cutting job for him (actually it was for his wife, but the reason is Christmas confidential).  The material engraved nicely and made a good sign.


December 31, 2014

Diary of Edwin B. Weist of Company A of the 20th Indiana Regiment

Gordon Bradshaw has posted a transcribed version of the diary of Edwin B. Weist, Company A of the 20th Indiana Regiment. The transcribed diary starts with the the regiment's camp at Falmouth and extends through several of the campaigns in which the Army of the Potomac participated including Chancellorsville, Gettysburg and Mine Run.  Like most civil war diaries, the bulk of the entries describe  routine duties. As I read more of these diaries, I find the typical soldier focuses on his own comfort, health and duties and knows little of the actual events. There are several entries based on rumors, such as a report that Vicksburg fell in the early winter of 1863,  that would prove to be incorrect. Although he participated in several major battles, they get scant mention.

The Aquia railroad gets mentioned several times in the diary. He also gives a good record of the weather they experienced, including some heavy snow.  Here is a typical entry from his time at Falmouth and Belle Plain.
Sunday March 8. Got a good comfortable bunk up composed of small poles covered with cedar boughs. It resembles a bed more than that we generaly have. Our camp is said to be about three mile from Bell plains landing, and about five from the old camp. The railroad is within sight, so allso is the Potomac river. We are not as much in the woods as we expected to be.
        Monday March 9. The weather to day has been beautifull indeed, resembling a May day. The view from the top of the hills wich surround our camp is grand indeed. The sparkling surface of the Potomac river in the distanced; the neighboring hills covered with camps; a train of cars just crossing the bridge, 75 feet high, and a regiment of cavalry on drill in the valley beneath, is a subject for a painter.
        Tuesday March 10. Was very disagreeable raining nearly all day, wich turned to snow in the evening. Weesner and Marsh were on detail, Mr. Thorn was sick so I have to cary all the wood we used during the day no inconsiderable job.

This regiment was one of the group that got sent to New York to stop the draft riots. Along the way, the rode a number of trains. That section is worth reading if you are interested in railroad operations behind the front line.

August 12, 2012

50 Tons of Hardtack

Stacks of hardtack boxes, barrels and grain sacks begin to fill the loading docks at Stoneman's Station

I made about 50 O Scale tons worth of hardtack boxes today. Fifty tons of hardtack (Army bread) is about one quarter of the daily requirement for the Army of the Potomac in winter quarters. Each box hold 50 pounds of bread. So a stack 4 by 5 by 6 is 3 tons.

These boxes are the Mark II version. I had earlier made a large number of bread boxes using laser cut one-quarter inch aspen wood. These looked OK, even though the grain on the boxes was not correct, especially the end grain and the sides had a noticeable draft angle.

The Mark II versions use a laser cut 1/8-inch plywood core with laser engraved and cut cedar veneer on the surface. The Mark II design builds up quickly and makes a nice stack. I may try some basswood later, as the grain on the cedar is fairly pronounced. I made stacks 4 by 5 by 6, but they can stack on top of each other. Prototype photos show these stacks 16 boxes high.

I also made some single and double boxes for miscellaneous detailing.


Two  hundred twenty new boxes at the Falmouth Depot.


July 26, 2012

Wooding Up


I was playing with my iPhone to take some shots I hadn't tried before. Looks like I need to paint the
backs of those rails!

Nice worm's eye view.

The trees in the background look cool from  this angle.

July 10, 2011

Pump House and Lineman


I continued working on the final details punch list for Falmouth. I resumed sculpting the climbing telegraph lineman for the pole, added some grain sacks, installed some guard rails and built a pump house.


The telegraph lineman is based on the photo from the Civil War. It shows a soldier at the top of  pole doing maintenance. Actually, in the photo it looks like he is hanging on for dear life as he poses for a picture. I can't see any tools.

I cut and modified a locomotive engineer figure from Cannon Scale Models so that he looked like he was climbing the pole. These figures out of production now. I found them at a train show for a good price,

 I replaced the Cannon loco engineers head, that had a typical RRer's hat, with a head from a 28mm Old Glory ACW soldier wearing a flat wide brim hat. The heads on Old Glory figures are overscale (they should be about 1/58 to 1/64th scale) and work well with 1/48 scale figures. I also converted a second figure that would be leaning on a tree watching the action.

Unfortunately, both these figures were damaged as I heated them to speed the cure of the two part modelers putty, in this case it was Andrea Sculpt. The metal in the figures actually melted. I used my hair dryer to speed the cure as suggested by the Andrea Sculpt instructions. Normally I use a small foil lined box with a single light bulb for heat. But I noticed the putty was taking a long time to cure with this arrangement, so I tried the blow dryer. Oh well.  Two little metal puddles later...


Unfortunately these two figures melted during
the conversion process. Note the very effective
backdrop and foreground integration  in
this view.
Here is the second pole climber with
 a coat of black primer and
dry brushing with white.
Fortunately, I have duplicates of the base figures.  So I redid the pole climber. This time around I used thick CAA to reshape the joints and Andrea Sculpt to make the jacket. This went quicker. I primed the figure and test fit him on the pole. So far, so good. Now I just need to finish painting him.


.


As I mix up small batches of putty, I usually have some left over. With these bits I made grain sacks. I will need several hundred of these so it might be worth my making a mold and casting them.


The pump house is a quick scratch build using scribed board and batten siding and scale lumber. The door is a Tichy casting. The stack is also a casting. I made a sign for the house, although I don't have a prototype to go by. It makes sense that they would have a pump for the tank. The small triangular area by the water tank looked empty, so I added the pump house. Once I decide on final placement, I'll glue it down and run a pipe to the tank.

Also visible in this shot is the guard rail I added to the turntable lead. This curve is very sharp and a guard rail helps keep the wheels on the rails. I also added  guard rails to the other sharp curves behind the tank.

July 6, 2011

Busy Day at Falmouth


The Falmouth area of the layout is fully operational and almost completely finished with scenery. There are just a few small details left like the roof of the tool shed, installing the telegraph line and finishing the figures at Battery Schaefer.

I though it would be fun to make up a switch list, build a train in the yard and take it out. This is a harbinger of what operations will be like on the model railroad. I am pleased to say that everything worked very well. The new coupler magnets work very well. They are smaller than the previous ones and don't inadvertently grab both pins. The McCallum ran well. The extra weight helped. It had no trouble working the Falmouth yard.

This positive result provides motivation to continue work. Here are some iPhone snaps depicting the action.

Stacking wood at the wood rick. This is a SMR fireman figure.
Two box cars at the freight depot in Falmouth. John Drye painted the two figures, named Doctor Franke and Mr Drye.


This is a first generation switch stand that uses a laser cut base. The new ones are photoetched.