A journal following the history, design, construction and operation of Bernard Kempinski's O Scale model railroad depicting the U. S. Military Railroad (USMRR) Aquia-Falmouth line in 1863, and other model railroad projects.
©Bernard Kempinski All text and images, except as noted, on this blog are copyrighted by the author and may not be used without permission.
-----------------------------------------------------------------------------------------------------------------------------------------------------------------

February 25, 2011

And now for your entertainment pleasure, our daughter Francine will play ...

110th Pennsylvannia at Falmouth
I am heading out for a weekend of rail fanning the PRR Horseshoe Curve. I know NS runs it now, but it is still PRR to me. Don't worry, I won't be coming home to tear out the layout and build an N Scale horseshoe curve layout. I am bringing some ACW miniature figures to paint at night. I ordered a bunch of 28 mm Renegade Miniatures.

The photo of the 110th Pennsylvannia at Falmouth is the type of scene I'd like to show in the background of my Stoneman's Station where the scenery is deep and forced perspective will work with 28mm figures.

A graphic from the Gettysburg Visitor Center 
showing how many soldiers actually 
make up a regiment, brigade and division.

Note the string of box cars in the background of the 6th Maine photo. I believe this is the only photo I have found that shows railroad activity at Falmouth. There are many photos showing scenes from Falmouth, but none showing the railroad.

Also note the single tree. I have built an oak for this spot but the more I look at this tree, the more it looks like a pine. So I guess I'll move the oak to some other place and put a pine in this spot. The tall tree is an important compositional element as it helps frame my Falmouth scene.


Eventually I'd like to portray a full regiment, or even brigade, in formation somewhere on the layout. The graphic from the Gettysburg Visitor's Center shows an example of what I'd like to do. Usually in wargaming and in modeling  the number of figures used in the display is some fraction of the actual number engaged, usually a ratio of 10 or 20 to 1. Thus a 400 man regiment might be portrayed by 20-40 figures. Showing a full regiment at 1 figure per real soldier might be illuminating to people used to seeing the selectively compressed number of soldiers usually depicted on a gaming table.

One time I was mass painting GHQ 10mm figures for a Johnny Reb Game. I had painted about 200 Union soldiers and before basing them on individual gaming stands, I arranged them in a single regimental formation. It was interesting to examine and compare. Talk about a thin blue line. Then consider a full strength regiment was about 1,000 men. That's a lot of people power.


Renegade Miniatures makes a nice line of soldiers marching, standing at attention, and at ease,


I understand that Renegade is closing out the ACW line, so order them now. The Renegade figures are a bit taller and beefier than the Perry miniatures.

PS: Does anyone get the title reference?


February 21, 2011

Burning down the house

Waiting for the glue to dry before the final touch up painting.
Several maps and text references indicate that the RF&P station at Falmouth was burned when the rebs retreated in spring of 1862. I had no other information about the station except that is was in an area away from town and perhaps that there were some slave quarters nearby.  Armed with that little information I decided to build a small, burned down station. I went with a 12 by 28-foot structure with a brick chimney at the north end. Since it was a wood building, all that remains is the chimney, stone foundation and some charred timbers.

Here are some in-progress photos.


The chimney is a plywood core with Plastruct brick sheet superglued to the exterior. The foundation is a basswood core with Slaters stone plastic sheet.


The ashes are bits of coal and Woodland Scenics cinders. The charred wood pieces are pits of scrap scale lumber roughed up and painted with dilute Paynes Grey acrylic. My daughter helped paint all the scrap lumber pieces.

I used a mixture of dilute white glue with heavy shots of burnt umber and black acrylic craft paint to hold down the charred wood pieces and the cinders. Adding the acrylic paint to the glue helps control the final color and makes the dilute white glue mixture permanent so that subsequent coats of dilute glue and wetting agent don't loosen the items already glued.

To the south of the station is the road to Chatham Manor. Amazing, the white fence has not yet been burned by the soldiers! Note how the fence continues on the backdrop.


I added an fence line and some cedar trees that Brian Kammerer sent me.
Note how the road and fence extend onto the backdrop,
The cedars help obscure the interface between the road and the backdrop. The illusion works quite well.

February 20, 2011

Crepe Murder

A warm February day- lets make tree armatures, I mean, lets prune the shrubs.
Not sure if AW or I is the Tom Sawyer.
 A warm day allowed AW and I to prune the Crepe Myrtle bushes.  Several years ago AW planted a set of Dwarf Crepe Myrtles in the front garden that make nice armatures for model trees.

So with me clipping and she picking off the seed pods, we performed Crepe Murder. That is AW's nick name for heavy pruning of the Crepe Myrtle shrubs.

While we were at it, we also pruned some other full sized Crepe Myrtles. These don't have the same bark texture as the dwarfs but there were a few seed clusters that might make decent trees.

Dwarf Crepe Myrtles.


Below is a white oak tree I made with weeds from the local field, a balsa trunk and leaf foliage from Silfor.  It is about 19 inches tall. The Silfor leaves are quite expensive. I used about half a $24 box just for this tree. I intend to plant it near the depot at Falmouth, but I haven't decided on the final location, so it doesn't have roots yet.  In the background are some cedar trees that Brian Kamerer sent me.

AW cleaning off seed pods

February 17, 2011

Sibley Tents - Mark 2

I made two more tents, this time with fabric instead of paper. To provide a foundation, I cut circular disks out of 1/8th inch plywood. The disk also had a hole in the center for the pole. I threw away the first model and reused the pole from it.

One tent has an open top, the other has the cloth regulating flap.


These tents are fairly big and there aren't many level places on the layout where I can put them. I haven't decided where these will go. There are lots of pictures showing these tents literally trackside, sometimes even between the tracks.

Note the tents between the tracks and the locomotive in the background. City Point, VA.

Detailing Falmouth - Sibley Tent

I stated detailing the Falmouth Station area with structures, loading platforms and tents. Here are some in-progress shots. The Sibley tents were extensively used by the Army and show up in many photos of Aquia Creek, such as here, or here. The injection molded Renedra bell tents are too small by about 50 percent to be used in foreground O Scale scenes for Sibley tents. They also are not quite right in terms of panel construction for Sibley tents.

I built this depot structure  about two years ago to fit this spot. It finally has a place to go.
I plan to remove the floor of the structure so I can do some elementary detailing inside.
The scene is is slightly back lit by the room lights. I should use
auxiliary lights to photograph this area, but I didn't tonight as these are quick and dirty shots.

Here is my first attempt at an O Scale Sibley Tent.  They were 18 by 12 feet, and could house 12 men. In the model Paper  simulates the canvas part and the tripod is brass wire. It is hard to capture that sagging cloth look with paper. The outside profile of the tent should had a slight curved or parabolic shape while the paper is straight.  I started adding the rope ties for the tent pegs, but didn't finish. The Sibley tent had 24 tent pegs. 
Here is the tent with the tripod secured inside. I still need to finish adding the peg tie down loops.

I plan to add a tent alongside the depot building. Here I am trying out the Sibley tent to see how it looks.
Note the hard tack boxes piling up.
.

February 15, 2011

My layout philosophy - Prototype or Freelanced?

I occasionally get notes from folks with questions and comments about this project. I thought a brief explanation of my modeling  philosophy on this project might be in order. This is an off-shoot of the dreaded prototype versus free lance discussion you frequently read in the model railroad press. If it makes you feel any better, ship modelers face the same issue. Noted ship historian Howard Chapelle once said, and I paraphrase, "one should never build an inaccurate ship model as it will throw off future modelers that assume you did your work correctly." I guess he is not in the freelance camp.

The Dictator never served on the A&F as far as I know,
but I may have one nonetheless because of the factors
I mention in the text.
While I am trying to be historically accurate, I am taking certain liberties with the layout, such as naming certain features and including some things that might not be appropriate for the USMRR A&F. The layout project is supporting several sometimes conflicting  purposes, first and foremost is to recreate the USMRR A&F Line in late March- early April 1863, second to support new products for Alkem Scale Models, and third to act as a prop for a book I am writing on modeling ACW RRs. So from time to time you may see some unusual things on the RR. I will usually point these out when I show them, but I wanted to clarify my approach in case some questions arise. So this puts me in the strong proto-freelance camp.

The question of gauge immediately pops to mind. I am modeling in standard gauge O scale, which by an historical quirk is actually 5 foot gauge. While 5 foot gauge railroads existed in the ACW, the USMRR was 4 feet 8.5 inches. I've had to adjust some things to reflect this, but I am happy living with it.

Then there are my W&A locos. What are they doing here? When I acquired these, SMR did not offer undecorated models. Eventually they will be repainted to more appropriate names, but for now my story is that they are captured and transfered to the Aquia line. The real USMRR would have probably repainted them as soon as they reached Chattanooga under Union hands, but I have other things on the do list in front of that. Furthermore, I am aware that the McCallum,  Haupt and Whiton did not run on the Aquia line, but I do not plan to repaint them.

The engine terminal and extensive fortifications at Falmouth, the planned mills at Brook and Accokeek, the location of the wye and Burnside wharf at the landing are all conscious decisions to deviate from prototype practice.  Furthermore, the track plan is severely condensed and items relocated to better fit the space available.

Bearing this in mind,  if you see a glitch, by all means let me know.  Nothing is set in stone and fixes are usually possible.
The ironclad USS Passaic is another foobie that might end up on the layout,
without the cannon ball dents of course. See my earlier posts about why.

February 13, 2011

Chevaux-de-what?

I continued the basic scenery and detailing of the area from Clairborne Creek to Falmouth. My objective is to have this portion of the layout completely sceniced before moving on to the new sections.  I now have the first layer of scenery on this complete area.  Now comes the fun part! Here are some in-progress photos.

We decided to name the fort "Battery Schaefer" in honor of our departed friend Matt Schaefer.

The figure standing in front of the bomb proof
is a converted Tamiya WWII tank mechanic. The inset
shows the before appearance
I painted about 20 figures to populate the battery.  I had these figures on hand. They started out as a CSA battery of the Washington Artillery. I repainted parts of the uniforms to make them resemble Union gunners. Most of these  figures are in firing poses probably a bit too energetic for training, but I have them and they are nice castings. So the idea is that the unit is drilling on two guns, while other gunners are lounging and watching the the trains roll by.  I saw a report that discussed how the artillery unit guarding Accokeek Bridge drilled and did target practice each day so this is possible.

I converted a Tamiya 1/48th scale German tank mechanic to an ACW gunner figure standing by the bomb proof waiting for ammo. This figure helps transition the forced perspective to the smaller 1/56th scale gun position. The flag is a stand-in until I can get the proper flag. It's from the 10th NY a zouave unit that was stationed in this area at this time. I have a bunch of 28mm and 40mm zouave castings, but they are charging and are not appropriate for my winter quarters scenes. I also learned that one of my favorite regiments, the 5th NY was stationed at Brook. I have scratch built and painted a bunch of 5th NY zouave figures in 54mm scale See this link for dioramas of those figures.

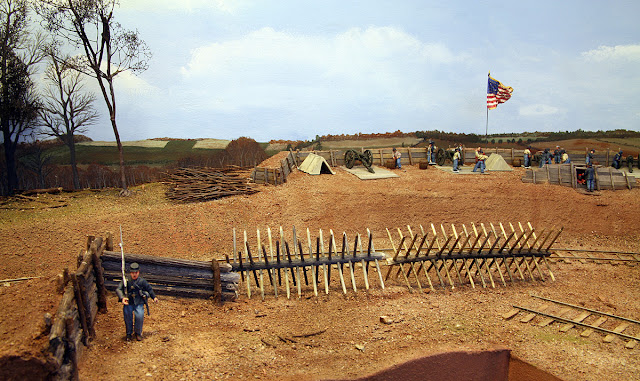
I have the Provost Marshall reports that detail the works at Aquia, Brook and Potomac Creek. The reports list the units assigned to guard them and the artillery they have. I have no record of actual works at Falmouth, but there are photos showing artillery dug-in on the ridge over looking Fredericksburg across the Rappahannock River that is near by.  So I based my entrenchments on those.

The Falmouth engine terminal area after the base coat of scenic ground cover.  I have lots of detail yet to add to this scene,

I added a line of entrenchments  and chevaux-de-frise between Falmouth and Clairborne Creek.
The chevaux-de-frise is a civil war era  
obstacle that is movable. In the time of danger the
they can be swung across the tracks to bar entry. In the background two sections of artillery are drilling. 

Unloading boxes of Army Bread. The boxes are laser cut to the actual size  and have markings of the
Union Baking Company in Baltimore MD. I built the freight platform shown here. A larger version still needs to be
built to the right of the tracks. I'm still tweaking the final design of the hardtack boxes. I need lots of them. 

Here is the finished Creek scene. I added a coat of acrylic gloss gel to the two part resin. This left too many brush marks, so I gave it three more coats of clear acrylic gloss.

The three tall trees are Loblolly pines. The large trees help make the overall scene appear bigger by
 compartmenting the view. Now the Battery Schaefer looks further away when you look down the length
of the room as you must peer through trees to see it.   I like how the limbs overhang the tracks.

February 10, 2011

Water under the bridge

I poured a two part resin to simulate the water in Clairborne Creek over on Monday night. I used Magic Water. I tinted the resin with two tiny drops of Krylon Camouflage Brown and Camouflage Olive.  The manufacturer recommend a solvent based tinter and not water based acrylics.

I used blue masking tape to seal the front fascia. Unfortunately either my textured paint surface, or the tape itself was incompatible with the resin. After about an hour the resin seeped completely through the tape and started to drip slowly on the floor. Fortunately I was prepared for that and had covered the floor with sheets of cardboard and newspaper.

I rigged up some surface clamps using small sheets of masonite and a layer of plastic cling wrap. This applied an even pressure to the fascia and was sufficient to prevent further seeping. The rest of the resin  cured in place. 

By Wednesday the resin had cured. I removed the clamps, stripped off the tape. Using coarse sand paper I was able to remove the thin film of resin on the fascia. I touched up the fascia paint and all was well.

I haven't decided if I will add some ripples to the surface. I do need to touch up the banks where the resin crept up the scenery. But, overall I am pleased with how the water turned out.


I tried a second shot for the missing barrel story with my DSLR camera. The camera body is too big to allow the same shot as I got with my iPhone. But this one shows the exterior of the car. I also added a figure with a
barrel in the background. Hey guys, turn around!

February 8, 2011

The Mysterious Case of the Missing Barrels

Photoshop fun with iPhone hand held shots while waiting for the resin water in Clairborne Creek to cure and harden.  JD Drye painted the two foreground detectives.


"I say Holmes, there certainly are no whiskey barrels in this house car!"

"Well if I catch the dastardly purloiners, I give them a taste of my staff they won't soon forget"

"If dem war whiskey bar'ls,  dares no telling war dey ended up,  I reckon. Hiccup"

"Well PVT Weilepp, why don't you volunteer to look for them?"

February 7, 2011

Mountain Top Removal

Train rolls past Redan A


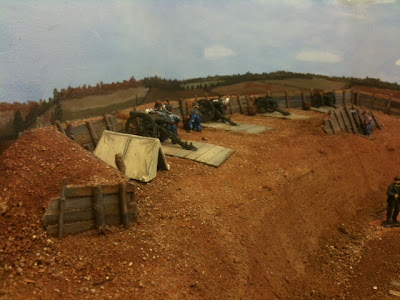
Here is a shot of the nearly completed artillery battery redan behind the Falmouth engine terminal.  Note that I earlier called it a redoubt in error. From wikipedia,

redoubt is a fort or fort system usually consisting of an enclosed defensive emplacement outside a larger fort, usually relying on earthworks, though others are constructed of stone or brick. It is meant to protect soldiers outside the main defensive line and can be a permanent structure or a hastily-constructed temporary fortification. A redoubt differs from a redan in that the redan is open in the rear, whereas the redoubt was considered an enclosed work.

The results of mountain top removal at Redan A
I replaced the first redan that JD was working because we realized that it was too cramped, mostly because the slope of the hill was problematic. To make more room for the redan, I had to shave off a good portion of the hill to create more flat ground to allow room for the revetments, the cannon recoil platforms and some interior space.  I was able to reuse some of JD's original revetments, so his work did not go to waste. With the extra space, I was also able to add a bomb proof for ammo storage.

A higher view of the Redan
The redan, cannons, and figures in this scene are 28mm (1/56th) scale.  See if you agree that the forced perspective works.

The guns and figures are stand-ins until the railroad delivers the new artillery. Most Union batteries were standardized on a single gun type. If you look closely you'll notice that there are three different types of guns there. Two are probably a Confederate designed Brooke rifle since they have double banding, but I've never seen a Brooke Rifle used as a field piece. They were normally naval or fixed fort guns. The new guns on order are 6 pound smoothbore Napoleans, probably the most common field piece in the war.
I have not finally decided on whether to install the downed trees as an abatis.  You can see some of them on the left of the redan.

We are still thinking about a name for the redan.


Hand-held iPhone shot looking down the length of the redan.


February 5, 2011

Two More Yellow Pines

Two Yellow pines made from  natural
weeds and static grass
 I decided that the scene between the Picket Camp and Stonemans Station needed a little more visual separation.  After some thought, I decided that a couple trees would help separate the two scenes.  So I made some yellow pine trees and tried them in front of the stone wall to see how they would do. I used a natural weed that I found by the Metro station near my house. I added sprigs of Super-trees and flocked with static grass.  I added roots with Magic Sculpt, but they have not cured yet, so they still need to be painted. Since only two trees violate the principles of feng shui, I added a third tree as a large stump.

I think they are quite convincing and took less than an hour to make both.

While I had my iPhone camera out, I photographed the new sentry on guard duty at Clairborne Creek.  This figure is a finely executed  Drabant casting. He is very well sculpted, if not a bit buff and pumped up.  This soldier will be called Pvt Kammerer in honor of my friend Brian Kammerer who has been helping with the backdrops and providing guidance on all subjects, especially artistic related.

The creek bed is ready for the addition of some epoxy resin water.  That might happen this weekend. What color should I paint the creek bed? I think muddy brown might be appropriate.

BTW I was kidding about that feng shui stuff. But threes look better than twos. I have no idea why.

PVT Kammerer gets a good view of the structure of the trestle.
Is that enough tangled trees and shrubs for you, PVT Kammerer?

February 4, 2011

The Jays, B & D - Mini work session

The temptation of steak teriyaki and AW's brownies was too much for JB Weilepp and JD Drye, the Jays (kinda like the Bob's in Office Space). They showed up for a work session tonight. This was JB's first visit to the layout.
JB working at the terra forming
After dinner and viewing an intro video about the layout, JB began working on the terrain forms at the far end of the layout where the tracks make a 180 turn-back curve. My idea was to disguise this curve in a broad cut. That was what JB did, by cutting and laying in cardboard strips of the basic hill shapes.


JD consults a prototype photo for reference while building the revetment.
The basic terrain for the revetment takes shape
JD was going to assist JB when I mentioned that there needed to be an artillery battery revetment  to be installed just outside of Falmouth. JD's eyes lit up at the prospect and he tackled it immediately.

I thought about naming it Battery Drye, but JD thinks that the naming convention implies that the battery would have been name posthumously. So the name is not decided yet.


A hi-tech way to display your reference photo

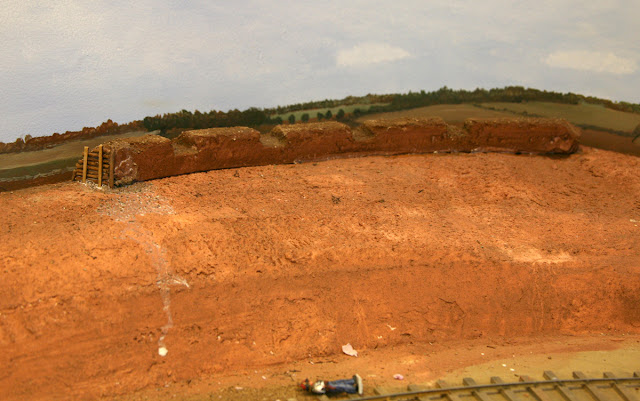
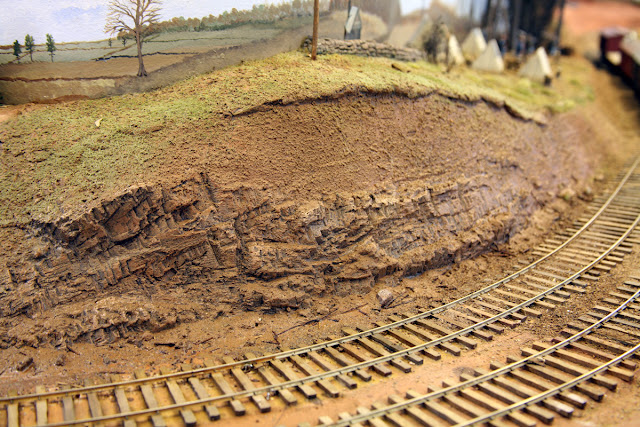
While they were working I began to carve rocks at the cut just south Stoneman's Station. I used a prototype photo from the cut just near Potomac Creek as a guide. These cuts were made by the RF&P about 10 to 15 years earlier, so they have ample time to weather and become overgrown. Thus I added a pronounced lip at the top of the cut, where erosion has undercut the slope.


Carved rocks with a black wash to check the texture


Basic paint and wet scenery
Another view of the wet scenery


All in all it was a very productive session. JB got the rough land forms installed and very nicely contoured with an asymmetric hill. Very realistic. JD got the basic revetment installed and started the detailing. This revetment will be 1/56th (28 mm war game) scale to convey that it is further back than it really is.


How guys cut a brownie

February 3, 2011

The 200th Post - time to air the dirty laundry

Tonight marks a double special occasion, the 200th post to the blog and the first finished scene. Here are some shots showing the final Picket Camp scene compete with campfire, tents, and laundry.

The officer with the sword is a Drabant figure. It comes with the finest cast sword I have ever seen on a figure. As to scale, he is a tad on the big side. Don't mess with the big dude with the sharp sword. There is a second Drabant figure on duty under the bridge. (Not pictured).

The off duty soldier with his hands in his pockets is a converted Artista conductor figure. I swapped his head and added a sack coat.


The pot is part of a cap from a pen with a 0.008 inch wire for a handle. I used two-part epoxy
putty to shape the pot.

Overall Picket Camp scene. The soldiers added the ladder to make getting to the bridge easier.


The right trousers? Note the pants and blankets drying on the tents and line.