Hope Santa treats you well!

Showing posts with label video. Show all posts
Showing posts with label video. Show all posts
December 17, 2024
August 1, 2022
The Perfect Camera for Model Railroad Photography?


I recently acquired a Canon R7 mirrorless digital camera with the kit 18-150mm lens. I purchased this camera as my former Canon 70D was over 10 years old. While it was in excellent condition, the newer cameras have surpassed it in technology. When I read about the Canon R7 I realized it had some great features for model railroad photography, particularly the automated focus bracketing feature and high resolution. I also was impressed by its lack of focus breathing at wide angle focal lengths.
Resolution
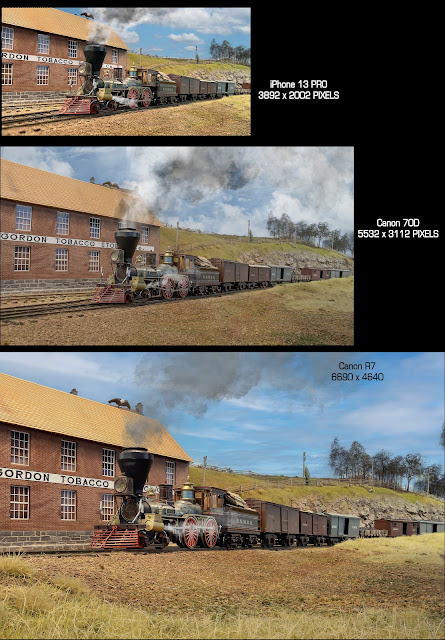
This next image is a comparison of similar images from the Canon R7, a Canon 70D and a iPhone 13 Pro. The relative sizes of the images shows their native resolution. The blogspot software shrinks images to save space on their servers, so you can't see the images at their true native resolution without using a file sharing service to save the full images. So I combined them in a single image to show the relative sizes.
The R7 is a 31 megapixel camera with 6690 by 4680 pixels. That means it can support a 22.3 inch print at 300 pixels per inch. That is more than enough to get a great two page spread in a magazine.
The R7 uses a APS (i.e. crop sensor). You might think that a 31 megapixel crop sensor would have problems with noise at high ISO. But that isn't usually an issue with model railroad still photography as we use a lot of light and can shoot at very low ISO. I used ISO of 100 in this test image. For action photography, the higher ISO needed to help stop motion can lead to noise. But both the Photoshop camera RAW and the Canon Digital Photo Pro software that comes with the R7 camera are pretty good at removing the noise.
I have found that cameras with APS crop sensors work better for model railroads than full frame sensors. I have had both. The crop sensor means the lens used on an APS camera have a telephoto effect. That forces you either move the camera back from the scene or use a wider focal length to get compositions that are the same as you would get in a full frame sensor. The bottom line is that you get more depth of field with a APS sensor in model railroad shots both for still and video shots. That is very helpful. Note this is opposite of what most other photographers want such as in portrait and bird photography, where they want shallow depth of field for the nice bokeh effect. I discussed that topic in more detail in an earlier post here .
Close Focus Distance
Beyond the amazing resolution, the camera with the kit lens has an astounding close focus distance. The grass in the foreground was nearly touching the camera lens. This obviates the need for a separate macro lens.
The camera is more compact than the 70D so you can get it in some tight places. But the iPhones cameras are better for shots like that.
Focus Stacking aka Focus Bracketing
The R7 offers automated focus stacking in camera. You enable this mode using a menu on the back screen. Once you enable focus bracketing, you then set the number of shots and focus increment you want to use. The focus increment is not defined precisely, so you might need to experiment. I have been using 10-14 shots and a narrow focus increment for my model railroad shots. There are some other settings for focus bracketing including a really neat one called "depth composite," which I explain below. You can find more info on this web page
Next compose your image. Then select a point in the foreground where you wish the focus to start. Once you hit the shutter, the camera will automatically take a shot, adjust the focus point, and shoot again until it reaches the number of shots you specified or the focus reaches infinity. The camera stores all the images on the card.
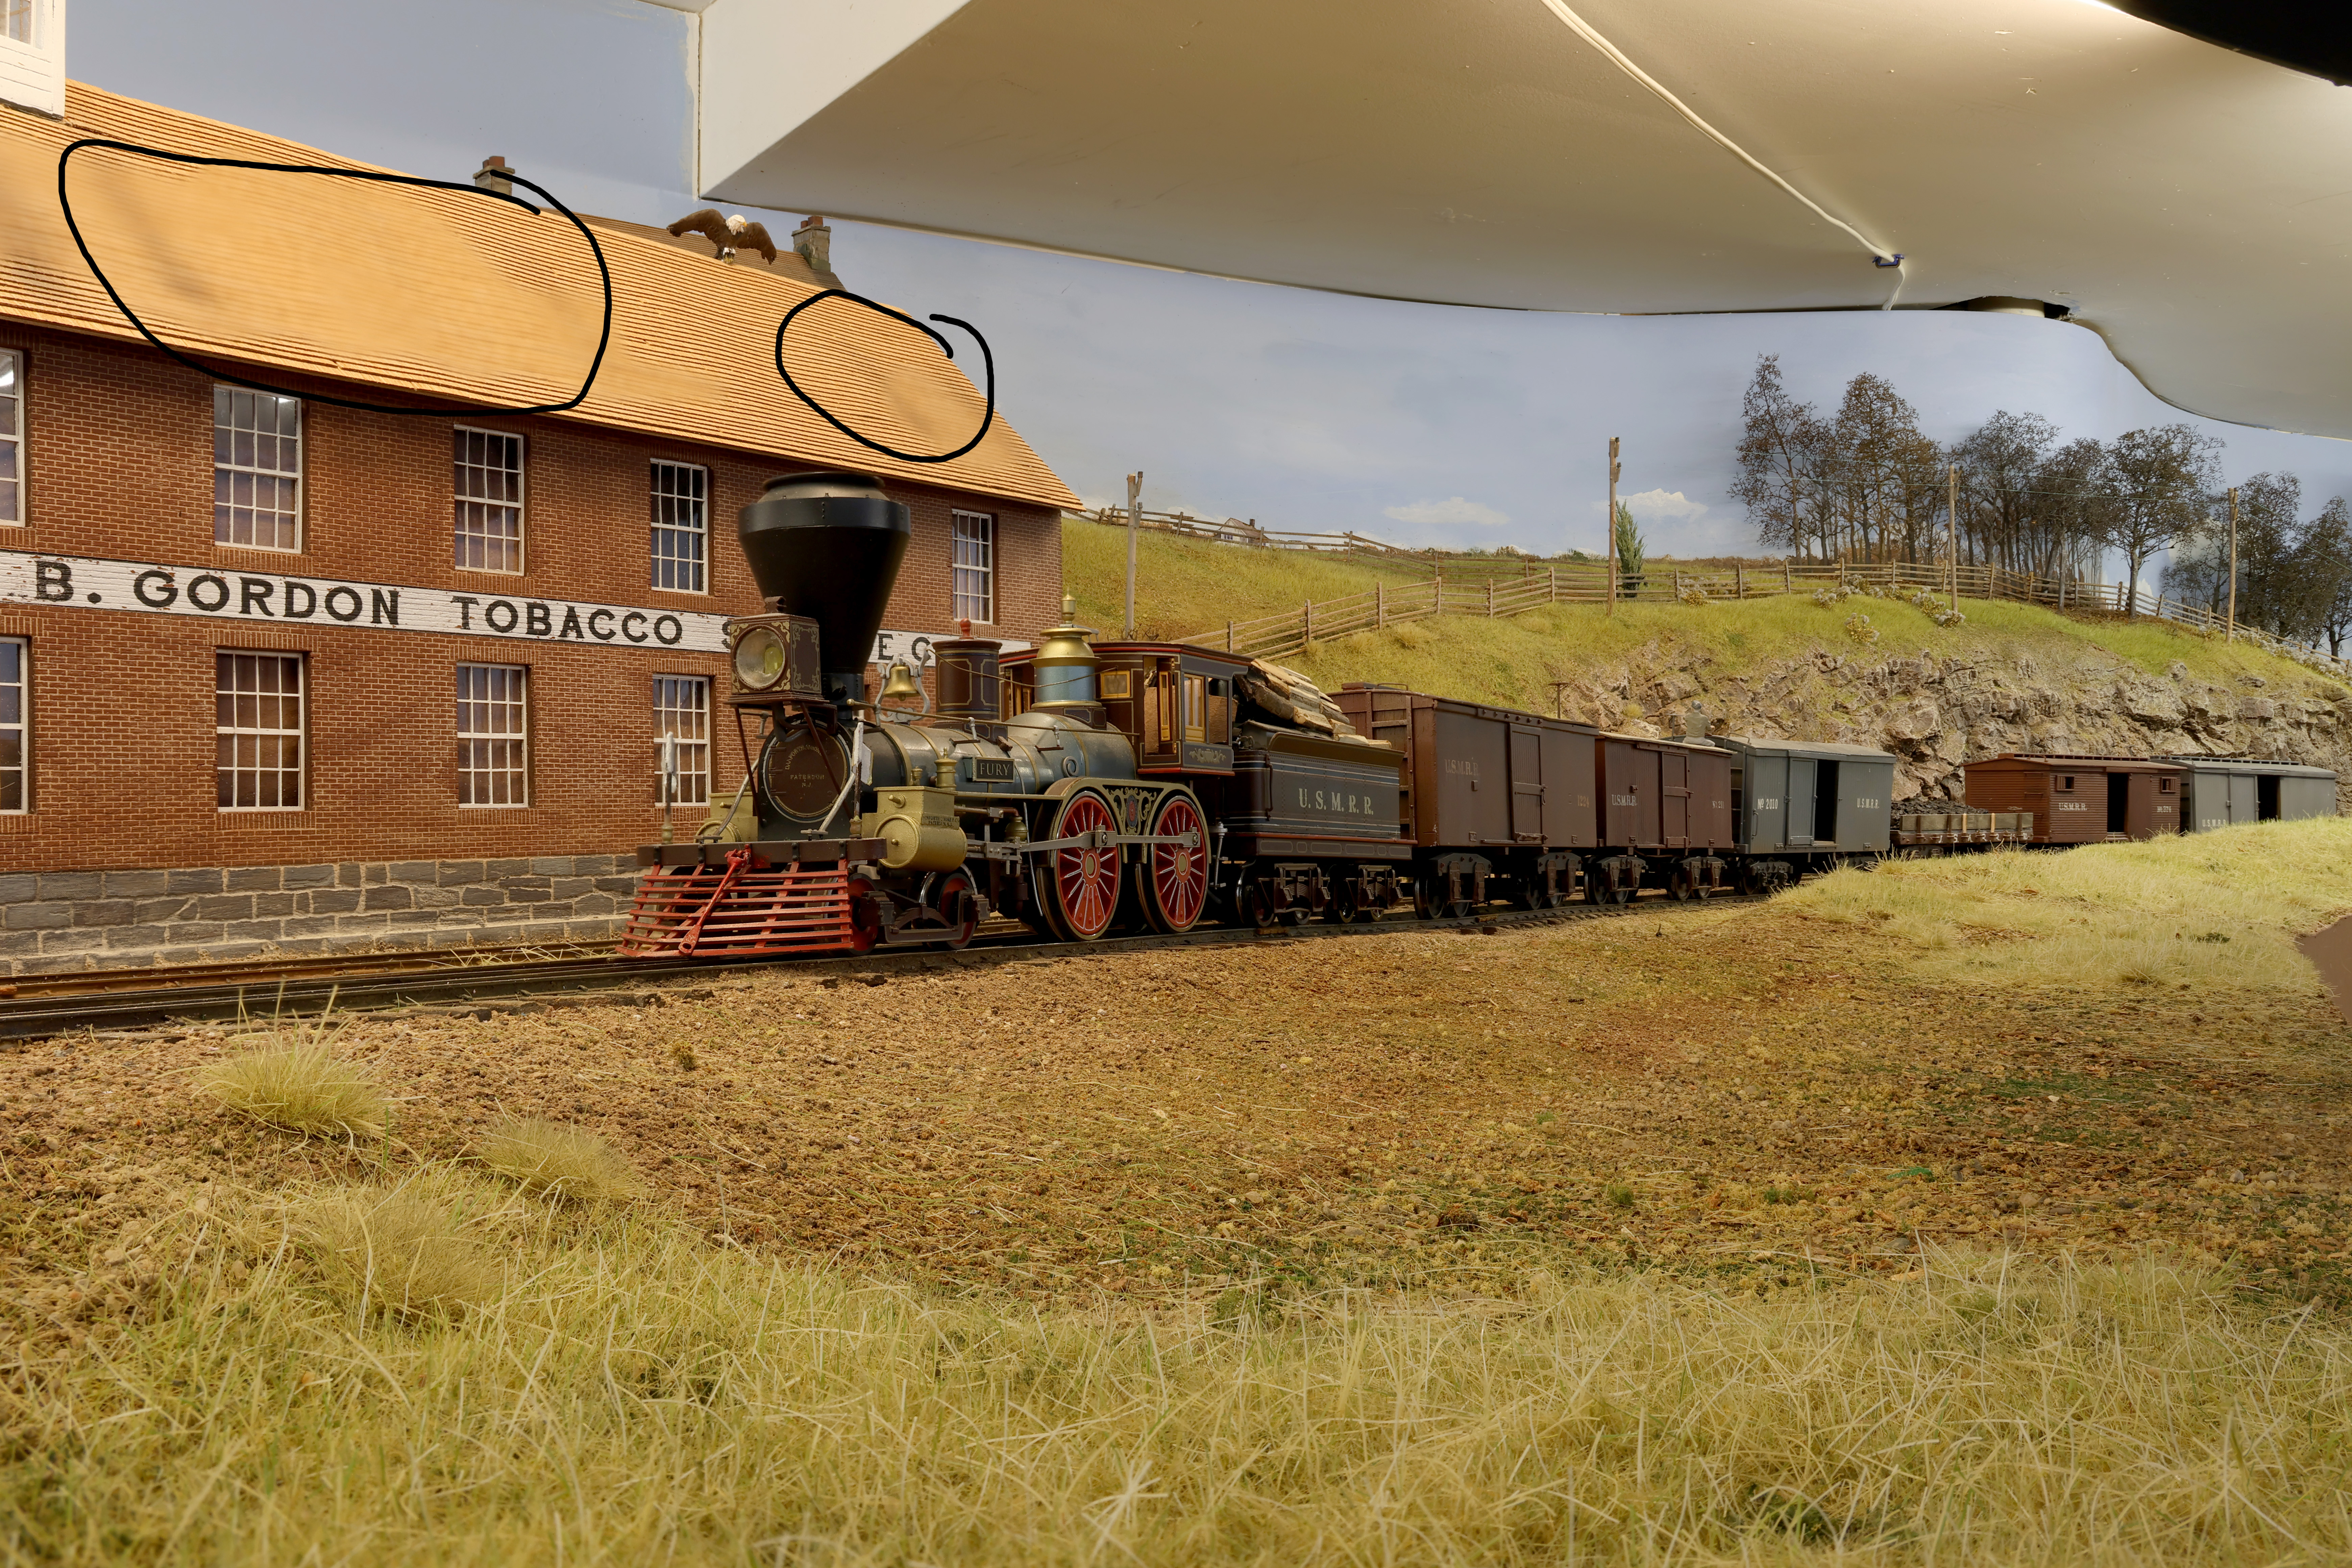 |
| Example of stacked image using in-camera Depth Composite. Note the problem area in shingles as indicated by the circles. |
Also, the camera saves the stacked image as a jpg file on the memory card. I prefer to shoot in RAW format not jpg. So in my work flow to date I have not been using the focus bracketing with depth composite enabled.
Instead I bring the stack of images into Photoshop. I use camera RAW to adjust the images. I synch all the adjustments, so the RAW images get the same adjustments. Then I do the align and stack in Photoshop. When photoshop is finished stacking, I flatten the image and do any special effects like sky replacement or adding smoke.
Focus Breathing
The kit lens also does not exhibit much focus breathing when doing the focus bracketing. Focus breathing (or lens breathing) is the phenomenon when the angle of view changes in your lens when you adjust the focus. When you focus from up close to infinity, you’ll see that the lens zooms out. It’s a small change, but a change nonetheless.
The change also happens when you adjust in the opposite direction. The lens will zoom in when you turn the focus ring from infinity to minimum focusing distance. If you go back and forth, it will zoom in and out. It’s as if the lens is breathing in and out, which is why it’s called focus breathing.
I could not detect any lens breathing artifacts when using this lens at a wide angle focal length. The artifacts would appear as out-of-focus fringes around objects that are closer to the camera. It is apparent in the iPhone image I posted above. Those fringes are very hard to correct as you must manually replace the fuzzy areas using editing software
Video
I put together a brief video showing how the automated focus bracketing works. It really is quite simple. It only takes a few experiments to get it dialed in to how you want it. I used 10 images to make my stack.
Bottom Line

The Canon R7 is an ideal camera for model railroad photography. It also rocks with a big telephoto for wildlife photography as it has very advanced autofocus capability, but that is a topic for a different blog
February 2, 2022
Amby to the Rescue

If you read my blog, you know I hate wiring and electronics. In the panoply of model railroad tasks required to build a layout, I rank wiring and electronics rank at the bottom. So I was delighted when Ambrose (aka Amby) Nangeroni offered to help finish build my telegraph system. Amby is an electrical engineer from Northeastern University. He has a lot of experience with model railroad electronics. He said he was willing to work on building the components at his home to minimize possible exposure to COVID as he needs to be extra careful.
I sent him copies of the documentation I had, plus a copy of the video of the prototype system in operation. He studied them before visiting and had some very interesting observations. He also asked me some questions that required me to review the documentation as it was long enough ago for me to forget the details.
After I made that video mentioned above, I had to send all the circuits back to Seth and Bill of https://www.modelrailroadcontrolsystems.com/telegraph-sounder-driver/ for some software revisions. That was about 2 years ago. They returned the updated parts to me and I promptly put them away. I had not worked on them since then.
Today, Amby stopped by my house to see the system as it stands and to better understand the design and application.
It was a thrill to get the parts out of storage and working again. Amby was very helpful in debugging some issues we had. A few wires had come loose while the parts travelled back and forth across the country. In addition, the antique sounder that I sent to Seth, got broken in the shipping process. The super fine 100 year-old paper-wrapped insulated coil wires broke. Seth sent me a replacement sounder as repairs to the old coil looked difficult. But the replacement sounder was not working. The reason was perplexing at first, but simple once Amby figured it out. All the contacts inside were corroded and needed some maintenance.
Once we sorted out the sounder, we were able to get the prototype station that I had assembled three years ago to work. We verified that the new software works too. Amby now has all the circuits at his house and will work on assembling them as his schedule permits. Here is a short video he shot at his house showing the original system in proper operating condition.
Amby also has some ideas on how to run the cables from the stations back to the dispatcher. He recommended prefabricated CAT6 cable with plugs and sockets, vice the terminal strips I was thinking about using.
In retrospect, I should have designed each station to connect to a data bus as opposed to individual CAT6 wires from each station to the dispatcher. That way we could run just one pair or wires to east station. Each panel would need a data bus interface, and there would need to be some kind of bus controller, but I suspect such circuits are available off the shelf. It might be possible to add that feature on to the existing system. If anyone has any suggestions on how to do that, please let me know.
 Last week Paul Dolkos and Ted York visited the Aquia line. Ted was in town to receive an award for a photograph he took, and Paul has showing him around.
The stunning image depicts wild mustangs in an action shot. They look to me like they are fighting. You can see Ted's photo here https://www.worldphotographiccup.org/wpc_gallery/finalists-2022/
In case you don't know, Ted also has a fantastic HO model railroad depicting the Santa Fe over Cajon Pass. I have operated on Ted's layout a couple times and it is a hoot.
Subscribe to:
Posts (Atom)