A journal following the history, design, construction and operation of Bernard Kempinski's O Scale model railroad depicting the U. S. Military Railroad (USMRR) Aquia-Falmouth line in 1863, and other model projects.
©Bernard Kempinski All text and images, except as noted, on this blog are copyrighted by the author and may not be used without permission.
-----------------------------------------------------------------------------------------------------------------------------------------------------------------
Showing posts with label Bolt Action. Show all posts

February 8, 2020

Playing Catch Up

This week has been catch up week for me. Both my mom and I recovered from colds, though hers was much more serious than mine. So it was time for me to get my do-list whittled down.

The laser cut parts arrayed on my work bench
The first task was to laser cut the parts for a large, intricate HO scale building for a client. It almost looks like a cathedral in appearance. The client did the artwork, as he is an architect.  Still it took me a few hours to prepare the drawings for my laser. Then another 8 actual hours to engrave and cut the parts. He will do the assembly and painting. We have more buildings to do for this client, so we are looking at other ways to depict the bricks other than engraving them one by one.

The mailbox project from start to finish
Next, I had to so some household chores. The first was to build a new mailbox that would match the new front door and have capacity to hold small packages. This was an opportunity for me learn some new skills and give my woodworking tools some exercise. The new door has leaded glass detailing. So the mailbox should have a matching glass insert. I never built a leaded glass piece before, so I went to Youtube and got the basics.  My experience in soldering brass kits came in handy, and I was able to make an acceptable diamond shaped leaded glass insert for the mailbox using pre-cut beveled glass sections and lead came. With an acceptable glass insert in hand,  I built a box with an opening to house the leaded glass piece.

With that done, I moved on to fixing the chair rail molding in the dining room. This was a residual task from the flood repairs. The contractor claimed it was a custom molding profile. So I took a sample to the local mill shop and low and behold, this molding was not custom, but available in stock. With $60 of molding in hand, it was a relatively simple matter to install the molding using my Kapex miter saw.

Rob's 1/72nd scale diorama
Then my brother visited for a few days. He wanted some instruction on painting and weathering an armored model. It was a M48 tank that he assembled at home. Over the next two days we painted, weathered,  and then built a small diorama to display it. This project was a lot of fun and my brother said he learned a lot. We used dry brushing, washes, chalk, and texture mud. The texture mud was helpful un hiding some of the flaws in the tracks.

On Saturday, I hosted a WW2 war game at my house. It was a scenario set in Holland during the Market Garden campaign. I enjoy hosting games. It reminds me a lot of setting up an op session. The game went well, though the Germans were able to cut the highway and were able to withstand the Allied attempt to clear it, though they took heavy casualties.

Hopefully, next week I can continue to catch up on the remaining do-list items.


British armor wrecks litter the battle field

September 26, 2019

The War Room

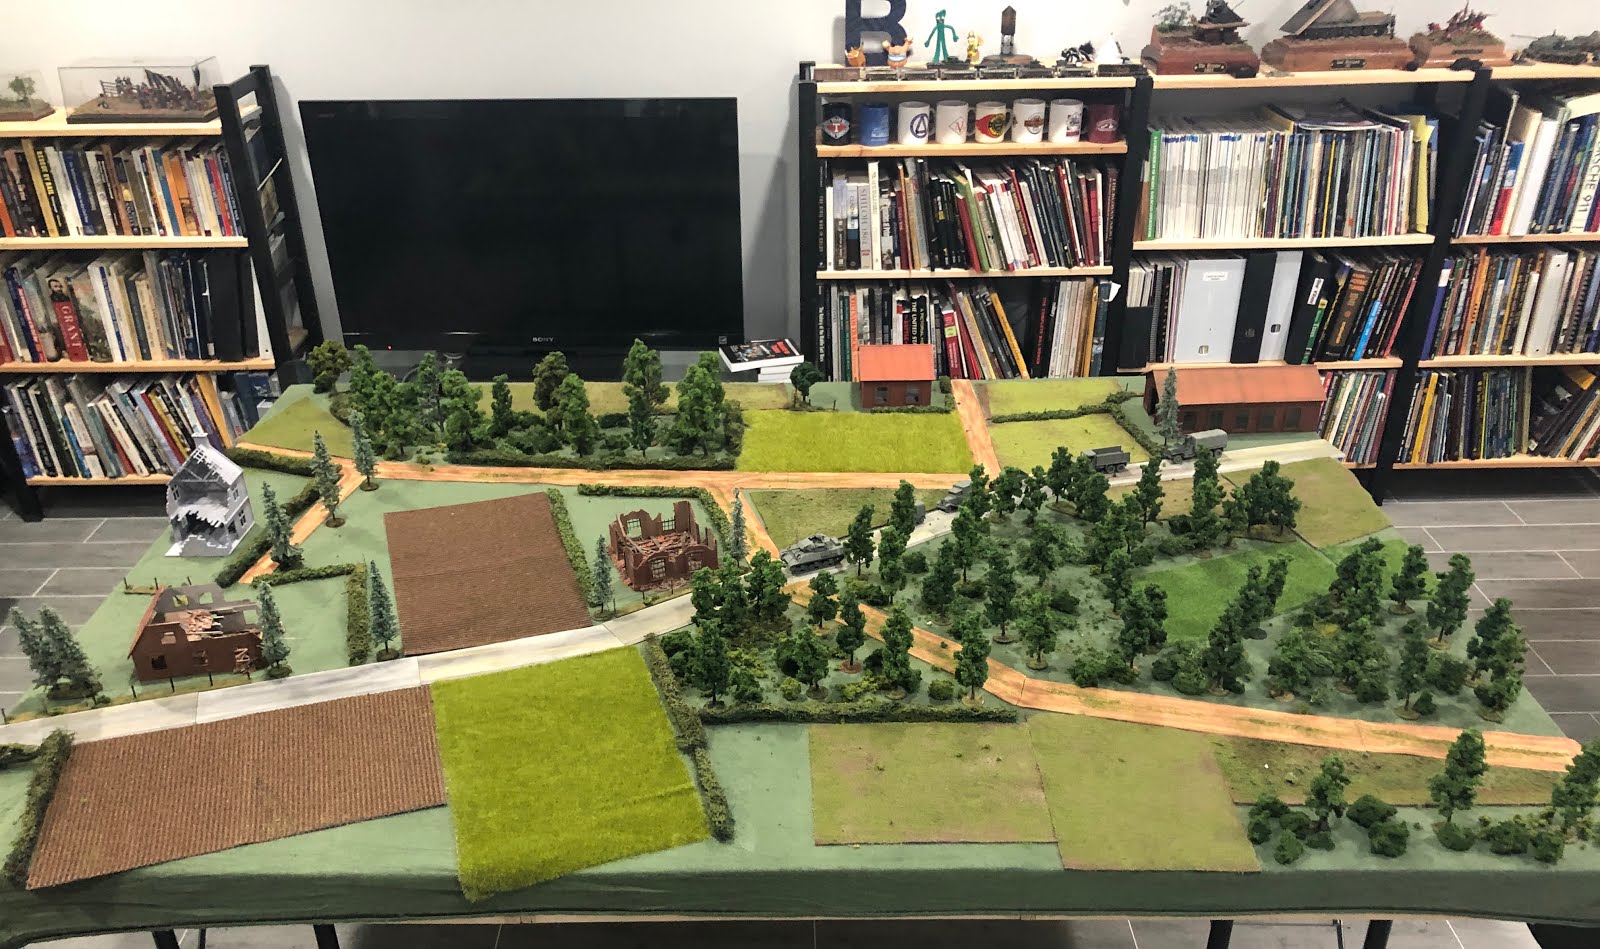
In August,  my niece, who acted as an interior decorator to help us with the basement renovations, coined the term, "war room" when discussing the front room of my layout that houses the Aquia Line from Brooke to Falmouth. I thought the name was cool. However, I decided that moniker applied better to the crew lounge when it is set up for war gaming.

Model railroad tables repurposed as a wargame table
This afternoon I set-up the first miniature war game in the new War Room.   The table is 5 by 7 feet overall. Ironically, the game table started as two 5 by 2.5 feet model railroad tables that I built for John Drye. He decided that he didn't have time to finish the project he intended for those tables. So, he traded those tables back to me for the benchwork of a  small layout I had built nearly 25 years ago.

I added a set of folding legs to the blank tables. These are lower in height than normal for a model railroad, but just fine for gaming.

Alicia helped cut pieces of felt for dirt roads. The main paved road
is pieces of masonite I cut on my track saw with sloped shoulders
Next, I made an additional 5 by 2 feet section that fits between the two 5 by 2.5 feet tables creating a 5x7 overall size. That section clamps to the other two tables. The whole arrangement is reasonably sturdy. It can be disassembled and stored when not in use.

The crew lounge is large enough to house the 5x7 table with plenty of room for the planned expansion of the Aquia Line.  Even Alicia likes it. She came down and helped me build the terrain board. It is very rare for her to come down to the basement. I think she is lobbying to keep the crew lounge /war room open.

War gaming scenery is a bit different than model railroad scenery. It has to be robust and reconfigurable. So it tends to be less detailed, and more stylized. But a lot of the same principles apply.

The figure below describes the scenario we will play. This is part of our commemoration of the 75th Anniversary of the liberation of Western Europe. Each month we have been playing a scenario that is appropriate for that month in 1944.
We have already done scenarios from D-Day, Fighting in the Bocage, and the Battle of Arracourt. This is from operation Market Garden, the Bridge too far campaign.


The first scenario we will play in the new "war Room" involves the Battle of Koevering,
on 23-25 September 1944. It was part of the Market Garden campaign. 


April 24, 2019

Is HO too easy and other random thoughts

Scene from war game last week
Activity on the Aquia Line has been slow lately as many other projects and demands have taken my time. A death in the family, my wife's uncle, required a short notice trip to Kentucky. Then we had other family obligations for the Easter weekend.  Nonetheless, in between those events we managed to get in another Bolt Action Game in the crew lounge and Mat Thompson visited me to help get my NMRA Achievement Program paperwork going.

A few months ago. Mat had asked me if I was willing to go through judging and complete the paperwork for the NMRA Achievement program. He assured  me that my current layout would probably meet most of the Master Model Railroader requirements and I just need to get the models judged and the paperwork submitted.

I have thought about this in the past, and even did some tabulations of the requirements I could satisfy. On occasion, I entered models for judging at NMRA meets, so I do have a few NMRA Merit Awards already. That's about as far as I got, as I decided that it wasn't''t worth the effort to submit the paperwork. Anyone that knows me knows that I hate boring meetings and useless paperwork.  Mat assured that the paperwork won't be too bad, and he would help, also known as holding my hand through the process. So I agreed to reinitiate the effort to get the Master Model Railroader certification.

Mat helped me get the Statement of Qualifications (SoQ) done for two categories, volunteer and author. Over the years I have presented dozens of clinics at NMRA events and others too.  At these events, the hosts usually presented me with some type of certificate, most of which I kept in a note book. So it was easy to document them. I also participated in many modular model railroad set-ups at NMRA events. For example, at the Madison NMRA National Convention, my steel mill module was awarded Best Module in Show. Many  of those meets were documented in the NVNTRAK NTRAK newsletter, which I published at one point. So, even though I never held a position on any NMRA board (see my comment about boring meetings above), I had more than enough "points" to meet the NMRA standards for volunteer.

The author SoQ was also relatively easy for me to document. Mat selected one of my books. The word count in the book, along with photos and diagrams met the requirement for author.  You have to submit a copy of the work, so Mat took a copy of my "Model Railroads Go to War" book to submit with the SoQ.  Turns out, writing  a blog would also qualify for the Author category. Since this blog has 973 posts, and more pictures and diagrams, I probably could have used it too. But it wasn't needed.

With those two SoQs done, Mat walked me through the other categories I would need.  We went over the layout pointing out what things need to be judged to met the various SoQ.  We concluded I would qualify for  Car, Civil, Structures, Scenery, Electrical and Dispatcher.  I need to do some paperwork for this and get the judges to visit. But it can be done without me having to build anything special just for SoQs.

The Dispatcher SoQ is a bit tricky as you need two NMRA officials to verify that you were at an operation session. I do keep a log of all layouts I visit and operate. (At this point, I have operated on 106 different layouts for a total of 154 sessions not counting my own operating sessions.) But I never got two people to verify I was there. However, Mat pointed out that my own operating sessions would count and they are documented on my blog, so two NMRA officials could verify them. Thus, I probably could qualify for Dispatcher category if I wanted to. But, I wouldn't need it, as I would have enough categories with Volunteer, Author, Car, Civil, Structures, Scenery, and Electrical.


Overall scenery and battle report

How our mind's eye envisions these games
My wargame buddies, John Drye, Mark Franke, and Bill Rutherford came over last  week for a war game  that I hosted. I should point out that all three of these guys are also model railroaders. We all had NTRAK modules at one point.

The scenario depicted the battle for La Fiere Causeway on 6 June 1944. This was D-Day, but the action involved the 82nd Airborne and elements of the 101st Airborne Division trying to capture the small bridge over the Merderet River about 3 miles from Utah Beach. I built the terrain board including some custom stone buildings with interior spaces.

The game was a lot of fun. John played the small  Germans force holding the stone manoir (farm) while Mark and Bill attacked with US paratroopers. I initially was the judge, and then ran the German counterattack up the causeway.  It is interesting that the game progressed similarly to the actual battle, even though we used Bolt Action, which is a very simplified, but elegant gaming system.

Running a wargame is a bit like hosting a model railroad op session. None of us are particularly interested in "winning." Many of the players that engaged in Bolt Action spend inordinate amounts of time tweaking their force list to have the ultimate "winning" formula based on an arbitrary points system.  That can result in some very unusual and ahistorical force mixes on a table.  They use these in competitive tournaments.

Our little gaming group couldn't care less about that. We devise our scenarios on historical situations and go from there. We might look at the points to ensure that the scenario is balanced, but we don't worry about it much. We really are playing for two reasons. One it gives as a reason to research and learn about WWII. And two, we get to build cool models and then play with them as opposed to putting them on a shelf.  And we have a grand time doing it.

After the game was over, John pulled out a Broadway Limited  PRR 2-10-0. I fired up that layout and we test ran it on PoLA. It did run nice and sound great, though it needs a keep-alive to run on my dead frogs.

John said to me, "You are right, HO is too easy. I went to Timonium last weekend and bought just about everything I need to build the HO layout."

John was referring to a flippant comment I made a few months ago when I said I was taking down PoLA because, "HO is too easy. You can buy everything you need."   For some, that is a good thing. But for me, I like to scratch build stuff. So I prefer the challenge of an odd ball scale and subject.


Now John is converting his N Scale layout  (see video above) to HO. In a fit of madness about 10 years ago, he decided to model the 4-Track Pennsy Horseshoe Curve region from Altoona to Cresson in N Scale. This was a highly complex layout. For example, he had more turnouts in his Altoona yard throat than I have in both of my layouts. The complexity meant slow progress. To his and helpers' credit, they did get a lot of track and scenery done. I helped a little too. Mostly with backdrop and rock carving. But during test sessions, the layout wasn't operating up to John's desires. Also, he was finding it hard to see the wheels and track. So he decided to convert the layout to HO scale. He will use the same benchwork, but build a PRR branch line using Kato Unitrak.


March 28, 2019

A vote for keeping the crew lounge

Scratch one German assault gun


Last Tuesday I hosted a wargame session in my basement for my friends. It was a fun experience and has me thinking about its implications for my layout redesign and expansion.

About the game. I constructed a temporary 4 by 6 feet  table in my crew lounge using some sheet foam, 1x2's and my portable saw horses.  This size table fit comfortably in my crew lounge area.

I set up a terrain board using a large piece of velour fabric.  Under the fabric was the 2 inch foam board. I had 2 sheets of 2 inch thick  2'x8' foam on hand, so I used the left over pieces to create a ridge line on one side of the board.

I added lots of trees from Scenic Express and Woodland Scenics. I made some hedges using furnace filters and flocking. For a road, I applied two wide strips of masking tape to the fabric. Then I airbrushed the road with acrylics.  Wargame scenery is different from model railroad scenery in that it must be robust to survive rough handling and has to be reconfigurable to portray different scenarios.

I had some brick buildings on hand that I could use. These were a result of doing some R&D to make brick buildings for a client. (I'll post more abut that later once I have results).  The key to wargame buildings is that the roofs have to removable.  I converted one building to rubble, which was a lot of fun to model.

Overall the board took about a day or so to construct and initially add scenery. Then I took another afternoon to add some additional details. I used mostly ready made scenery items such as plowed fields, grass sheets, etc. To enhance the look, I sprayed some adhesive on the cloth and sprinkled ground foam. This isn't permanently secured. Once the board is taken down, I can gather the loose ground foam and reuse it. This is an idea I borrowed from my late friend, John Hill. He was a master at making nice, temporary war game terrain  boards.

Building the board was a lots of fun. My wife said it was very nice when she came to check on me to make sure I was still alive in the basement. BTW she won't let me have a refrigerator in the basement because she says, "then I'll never see you."

Mark and John slugging away with their armor
John Drye and Mark Franke came over to play the scenario using the popular Bolt Action wargame. The scenario was a depiction of Kampfgruppe Huber's attempt to cut the main supply route during Operation Market Garden that I had researched and developed. (NB, designing a wargame scenario is a lot like designing a model railroad layout. You take prototype information and apply it in condensed form to your available area. I am personally more interested in the simulation aspect than the competitive aspects of the game.)  John lead the Germans, while Mark had a small British combined arms team of Sherman tanks and infantry counterattacking from the south, and I lead a reinforced platoon of US airborne soldiers from the north, reliving my days as a cadet lieutenant in the 307th Engineer Battalion of the 82nd Airborne.

John was able to cut the road for about two hours (6 game turns) before the counterattacks pushed him back. He was heavily outnumbered, but he had two very powerful Jadgpanzer Assault guns as his main offensive force. Unfortunately, they did not perform well and Mark's Shermans and bazookas drove them off while destroying one assault gun, and taking no loses on their own, though one of Mark's infantry squads ran off after a failed assault in the woods.

As for my part in the battle, the main action was far from my platoon, so I spent most of the game getting PT as the paratroops ran across the board. We arrived just in time to mop up the remnants of the German infantry and to take some bazooka shots at the German armor.

Overall it was a fun experience. I enjoyed making the terrain board. Since the Aquia Line is winter season, it was fun to make some green terrain again.

So, this raises some questions about how to expand the Aquia Line. Should I keep the crew lounge open so that I can host more games like this? Alicia is definitely in favor of this. Or go all in with the expanded Aquia Line?  Kinda of where I want to go. When I mentioned this to John, who also has a model railroad layout and likes to wargame. He said words to the effect that, "I can use my dining room for gaming, but I don't have political constraints imposed by a wife." I suppose I could use my dining room too, as long as it was  very temporary. There is also the option of using my garage for occasional games.

Perhaps the phased approach to expanding the Aquia Line is the best. Replace PoLA with O scale layout in the same footprint as the former PoLA, then fill the crew lounge in a later expansion.  In the meantime, I get to host one more wargame before I have to strike the terrain board to get ready for an April 6th Op session on PoLA and the Aquia Line.