A journal following the history, design, construction and operation of Bernard Kempinski's O Scale model railroad depicting the U. S. Military Railroad (USMRR) Aquia-Falmouth line in 1863, and other model railroad projects.
©Bernard Kempinski All text and images, except as noted, on this blog are copyrighted by the author and may not be used without permission.
-----------------------------------------------------------------------------------------------------------------------------------------------------------------

August 30, 2019

But First Syndrome - 1,000th Post!

1. Work-in-progress on my new Festool based work bench


As the continuing saga of the flood recovery unfolds, I am in the garage making a new work bench to house my miter saw and festool collection. How did that happen? Surely, working in the garage isn't on the basement's critical path.

Turns out it is. See, I want to get my home office set up and running. I have the computer and my desk set up. Good, I have a lot of computer related work to do.

But first,  I need to get  the display shelves built so I can get my models put away in a reasonable fashion. So I need to work in my wood shop.

But first, I need to sort out the stuff that we brought up from the basement and placed in the garage. Now that I cleaned out the garage, I can start working on the display shelves.

But first, I need to get the workbench set up in the garage. Ok, I'm starting to clear off the Multi Function Table (MFT). I am ready to cut.

But first, I need a plan. Ok, let draw a design.

But first I have to get the casters to find out the dimensions.

Ok, got the plans drawn. Now to get some wood, and so on....
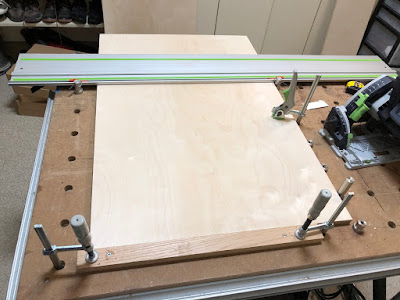
2. An example of the dogs in action
After three days of garage work, I have the work bench set up. Next I need to put on a couple coats of shellac on the cabinet base and install the drawers.  Then I can access each tool without having to unstack them each time.  I am using the Pre-built Festool SYS-AZ drawers. They are perfect for Festool systainer boxes. They don't cost much more than a set of drawer slides and a piece of good plywood.

I used baltic birch plywood (over $100 for a 4x8 sheet!)  and 3/4inch red oak trim. I plan to finish the wood with a clear shellac as I like the look of the wood as is, though I wouldn't mind having the oak a bit darker. But I don't want to use any stain.

The whole cabinet is mounted on locking casters. That is really handy for cutting long pieces that might not fit in the garage and for cleaning up. The miter stand and the MFT are the same height. If I need to cut long pieces, I can use a support clamped to the MFT to make a temporary miter stand.  There is no space in my garage for a dedicated miter stand, so that is my work around. This is the way I've always done it. Check out this video below to see a good explanation of how it works.

 Those of you that use a Festool MFT are probably familiar  with 20mm dogs. For the rest of you, a dog is the name for a metal dowel that fits precisely in the holes in the MFT  table. The dogs, when used in conjunction with a track saw and track, allow all kinds of cool precision cutting without a table saw.  (see photo 2)

3. The Dog Pound
Anyway, the dogs like to roll around when not in use and hide in unlikely places. So I built a shelf in the workbench with 20mm holes and M8 threaded inserts to hold my collection of 20mm dogs and locking knobs. I call this the "dog pound."

Yes, this is the 1,000th post on my blog!  Thanks to everyone that follows along.


August 26, 2019

The Model Railroader Kiss of Death?

Mock up showing the height of the benchwork
\under the bridge.
Paul Dolkos stopped by today in part to see how the flood recovery was coming along.

We discussed plans for the Aquia Line expansion. Paul agrees with Alicia that the Aquia Line expansion should have minimal impact on the crew lounge. He suggested a narrow shelf along the east wall (the wall where the couch is now) instead of the big bridge scene.

The problem with the big bridge scene is that the bottom of the bridge would only be 28-30 inches above the floor. That makes placing the couch in under the bridge a problem. The photo at the left of the bridge mock-up illustrates the problem. Another concern is that the the river level under the bridge will be lower than the Potomac River at Aquia Landing on the opposite side of the room. That might cause some geotechnic confusion when once can see both scene at the same time.

To address those concerns I modified the plan. Instead of the large trestle, I would instead have an open country scene along the east wall. Part of that scene would have the track paralleling Clairborne Run, as it does in the prototype.

To satisfy my desire for another bridge, I would put a low trestle in the north room where Falmouth is now. There was a long low trestle at Accokeek Creek on the prototype, so having another trestle would be very plausible.

After Paul left, my advance copy of the September 2019 issue of Model Railroader arrived. The issue features a photo of the Aquia Line on the front cover.  I have had my modeling featured on the cover of several other magazines and catalogs, but this is the first time my work has appeared on the cover of Model Railroader.  I had a spot reserved for it on my Wall of Lost Layouts, so I framed it and put it up.

Now it is a well known phenomena that when one of my model railroads get published in the model railroad magazines, the layout is doomed. Can the Aquia Line be the exception and survive?  I hope so. It did survive the great flood of 2019.  I hope if stays around for a while longer.

August 25, 2019

Work sessions galore

Alicia, Danica and Adam in the atrium of
their new home.
Last week we took a break from flood recovery to head to Alabama to help my daughter and son-in-law with some work on their new house. They relocated to the Birmingham area and purchased a house that needed some work.

After 6 days with them, we returned to Northern Virginia to continue to rebuild the basement.

I finally have my office and computer set-up and operational.  The past few days I built a new workbench for my hobbies.  I still need to get it installed and the modelling tools and supplies organized. Hopefully in a few days everything will be back to normal and I'll start working on the Aquia Line as well as catching up on Alkem Scale Models.

Fascia frame for Marty's layout
Today I  and some of my Festools took a ride to Gainesville to help Marty McGuirk with some carpentry work on his layout. Stic Harris was also there. He worked on the track lighting and the swing gate. I worked on fascia  for the left end of the layout. Marty wanted to create a "picture frame" effect for the far end of the layout.  The photo at the left shows the fascia "frame." The area by the clamp still needs to be trimmed to the final profile. I also used my track saw to rip several more fascia panels for Marty to install on his own. The Festool TS-55 track saw is great tool.

Marty's layout is coming along. It won't be long before he can run some trains across the whole branch line.


marty says, "This will be where the sluice for the paper mill will be."

August 14, 2019

Haupt was Right

The future site of the expanded Falmouth sits above the bookshelves and TV.
One of the reasons Herman Haupt ordered the construction of the truss bridge at Potomac Creek was that he was worried about the effect that a freshet would have on the support structure of the bridge. So he had the construction corps build the truss bridge that I also modeled to replace the trestle. Well, it turns out, the Aquia Line did endure a freshet, in 2019! It didn't destroy the bridge but it did cause flooding in the basement. As much as 5 inches fell outside, but only about a half inch of water flooded the basement where the Aquia Line resides. Luckily the Aquia Line layout survived with just very minor damage, though it did get a lot  of dust during reconstruction. I had planned to remove PoLA in December, so the flood just expedited that process. Tom is rebuilding PoLA in his basement and making good progress. More on that later.

The only remaining vestige of PoLA is the hole and wires in the wall by the stairs.
Over a month later, we are still rebuilding, but the majority of the heavy work is done. Viewers are unanimous that they like the new look. My niece, Katrina, helped with the color selection. Apparently, grays are in now.  I tried to explain that this is a Yankee railroad, but the interior design fashionistas had their way.  If you want to remember what is was like before the flood, check Model Railroad Planning 2020. There will be an article on PoLA in that journal.

Mom is enjoying the new crew lounge
I reconfigured the crew lounge to prepare for the Aquia Line expansion in 2020. The main change was to move the TV from the east wall to the south wall. Luckily each of these walls were prewired for the TV coax cable. It just took a little debugging to get it all to work. I also consolidated most of my books and magazines to the south wall shelves. It's nice having most of my library in one spot. And yes I have read nearly all those books, and consult many of them periodically.

The new layout plan includes a large bridge above where the couch is now. Falmouth will reside on a shelf along the 20 foot wall on the south side. The expanded sidings at Falmouth will allow us to run longer trains.  The beer mugs and Roman helm will have to find a new location when I start expanding Aquia.

The gray color scheme really accentuated the difference in color temperature of my recessed lights. I had replaced  the bulbs one by one over the years without paying attention to the specs of the lights. So I had a mix of LED and CFLs with varying color temperatures.  So I went to the store and got a set of matching 5000K lights. Once installed, the difference was amazing. I still have 2700K lights in my office. Now to me, that light looks too yellow. I'll replace those next.

Some of my gaming buddies are lobbying for military art prints on the walls and a gaming table in the center. But I am hesitant to add them, as I plan to paint sky on the walls above the expansion.  If I have a gaming table, it will be portable and able to be stowed in one of the closets.

A few days ago we had a torrential rain storm that lasted about 30 minutes. The newly designed sump pump worked as planned. Then yesterday, we had a brief power outage on a sunny morning. Again, the back up battery powered sump worked as designed,.

I still have to set up my office, rebuild my modeling workbench and finish cleaning the layout and installing curtains. But that will have to wait while as we are heading to Birmingham, Alabama to visit my daughter and son-in-law and help them with their new house. They have lots of work to do. It's nice to know we are leaving the Aquia Line in decent shape.


August 11, 2019

The floor is done.

The contractors finished their work on Saturday. They worked very hard and were super nice.  They were the only crew to take on the job and they did it with gusto. We plan to use the same crew to do some remodeling work on our front entry.
The crew - Edwin, Jeff, Alberto, Fasto, Erwin and Rudi (l to r) 

The tile looks great.  It will take a few vacuuming and mop ups to get all the tile grout up.  I think tile is a good surface as it can survive an occasional spill plus should hold up in minor floods.

I plan to put some kind of foam tiles near my work bench and  spray booth as that area sees the most paint spills.  Speaking of work benches, I plan to redesign my model building bench. I want to make it smaller to give more room for operators at Aquia Landing. I also will be rebuilding a new woodworking bench in the garage.

In order to install the tile under the layout they trimmed some of the legs with my permission and used temporary 2x4 supports to support the layout. Once the tiles were in and secure, I used shims bring it back to the correct height. There was very little damage to the layout. In a few places I will touch up the back drop where the movement caused some cracks in the scenery.

The plastic sheeting worked great for keeping dust off the layout.  I didn't put sheeting over all of the Aquia Landing area so there is a lot of dust that I need to vacuum up.

We changed the wall colors to a light warm gray. It really helped brighten the room.  I do plan to paint a large backdrop on the crew lounge, but for now I'll enjoy the fresh paint.

I still have a lot more work to get the basement back in action
The workers also helped me carry the book boxes down to the basement, which was a great help.  But before I put the shelves back up, I need to relocate the TV. That means trying to figure out the internal cable TV wiring in the house. I am also taking this opportunity to reorganize my library.


August 8, 2019

Two more days....

Installing the new baseboards and getting ready to paint. 


The contractors tell me they will be finished with the flooring and wall repairs in two more days. Then comes the unenviable task of cleaning up all the construction dust and putting everything back together.

I plan to redesign the work bench in this area making the
 work bench smaller and the aisle by Aquia Landing larger. 
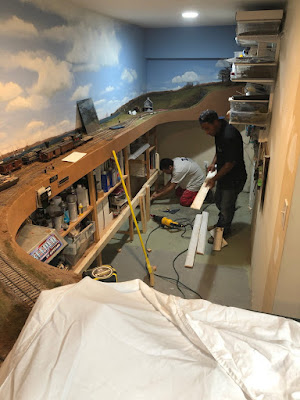
The photo at the left shows how the workers built temporary supports to hold up the shelves at Aquia Landing while they install the tiles underneath.

I will take the opportunity to rebuild my modeling bench. I plan to reconfigure the workbench so that the aisle is wider. I may also get rid of the shelves on the back wall. Time for another purge.


The tiling work has proven a challenge to Alberto and his sons. They are used to working in wide open areas without so much stuff in the way. They are doing a good job of working under the layout. But dust is getting everywhere.

The tile will look nice when done and hopefully be more survivable in a flood.

I had to move stuff around to make clearance at the floor level, so my books, modeling supplies, and spare kits have been scrambled.  My garage is full of boxes of books, tools and supplies. I suspect the probability of more stuff getting purged is high as my fatigue level with this project increases.

Alberto and his sons are working hard to
install tile under the existing layout.

August 5, 2019

Basement flood repairs underway

We put up plastic sheets to keep the dust off the Aquia Line. 
Tile surface in the crew lounge. Looks like 
a big mess right now.
Recovery work continues on the basement. The contractors have about half the tile installed. The workers have been able to install the tile under the exiting benchwork. They are either jacking up the legs or trimming them with a undercut saw and then sliding the tiles in place. They are working very hard, and are doing  good job of protecting the layout.


We covered most of the Aquia Line with cotton or plastic sheets to keep the dust off the layout.

The tile is darker than the laminate we had previously. The walls will get a light gray color with white trim.  A good portion of the walls in the crew lounge will eventually be painted sky blue for the back drop.

August 2, 2019

The Layout Formerly Named PoLA


Ready for the tile contractors


   The crew lounge has been purged of all vestiges of PoLA in preparation for the tile contractors. I hope that process goes smoothly. They start tomorrow. I'm keeping my fingers crossed.

I plan to expand the Aquia Line, but not until after November, when we are set to host Northeast Interchange. That is an event we have been hosting in conjunction with model railroaders from northern New Jersey for the past several years.

Mock up of Port of Beaumont. I need to make sure the room lights are the same intensity and color temperature

In the meantime, I have been looking at a small HO layout for my office.  I mocked up the Port of Beaumont (PoB) layout to see how things would fit. I used some of the Ikea shelves leftover from PoLA. One constraint is the electrical fuse panel on the far left wall. I must maintain easy access to that.   This is a relatively simple layout that shouldn't take too long to build.

This plan gives me a nice place to display my HO ship models, allows me to switch my HO scale cars, in particular, the DODX cars that I produced via Alkem Scale Models. Having an HO layout also acts as a test bed for me to develop new HO products, such as my chain link fences.  Plus, I can enjoy looking at the layout when working on my computer in the office.

Since PoB will be small, it will allow me to finish it with lots of super detailing, including lights, cranes and maybe even animated road vehicles. I also plan to make the layout in easily separable sections in case I need to move it.