A journal following the history, design, construction and operation of Bernard Kempinski's O Scale model railroad depicting the U. S. Military Railroad (USMRR) Aquia-Falmouth line in 1863, and other model railroad projects.
©Bernard Kempinski All text and images, except as noted, on this blog are copyrighted by the author and may not be used without permission.
-----------------------------------------------------------------------------------------------------------------------------------------------------------------
August 30, 2015
Kalmbach accepting orders for my next book
Here is an ad Model Railroader is running in the October Issue. A preview of the book is available on the Kalmbach Books web page at this link.
These are 45 new, never before published, track plans.
The timing might not work out, but I hope to have copies of my next book at the the MARPM next month. The book is due on 30 September 2015.
2015 NMRA Convention Report
18th hole at the North course at the Reserve Vineyard and Golf Club. A beautiful course. I even parred this hole. |
The model railroad highlights included meeting old friends and a bunch of new people. The list is long but special thanks go to manufactures that agreed to support the PoLA project layout in one way or another. These include Atlas, BLMA, Fox Valley, Tangent Scale Models, LARC backdrops, and Walthers.
Access walkway at Bill Decker's layout. |
Mark Dance describing his amazing layout |
I attended several interesting clinics. The highlights included Mark Dance's description of his amazing N Scale layout. It has to be one of the most complex track plans and well engineered layouts ever created. His layout has innovative ideas throughout including novel construction techniques, several movable gates, movable floor sections, and sliding train storage. The track plan includes a double mushroom. He was featured in MRP a few years ago, but it was great to meet and talk with him.
Bill Decker's scale model of his layout |
Marty McGuirk gave a clinic at 10:00-11:00PM Pacific Time. To us Virginians on East Coast Time, that clinic did not end until 2:00AM. He said the next day he doesn't remember doing it, but he managed to keep me awake.
I did my two clinics twice. I even finally got some of the clinic attendees to laugh at my jokes. There were numerous clinics on various electronic subjects. These don't interest me that much, so I skipped most of them.
Mike Blumensaadt's Manassas Junction Diorama |
We were pleasantly surprised to meet Alicia's cousin Barbara at the show. She and her husband are serious model railroaders. It will be fun to see what they end up building.
Louis-Dreyfus Grain Elevator |
New Bachman 4-4-0 |
At the train show I spent most of my time talking with vendors and publishers. I did not spend too much time looking at new products but I did note the retooled HO scale Bachman 4-4-0. It should get some interest from HO Scale ACW and early rail modelers. The engine has the motor in the firebox and will have optional DCC and sound installed.
Steve Williams gave me a tour of the N Scale FREMO layout. |
There was a huge N Scale FREMO layout that looked very interesting. Lots of fine modeling was on display on the modules.
All in all a fine week. Give an attaboy to the Portland area NMRA volunteers.
August 20, 2015
Upcoming Talks at NMRA Convention
I will be presenting two talks at the NMRA Convention in Portland, OR next week. The are scheduled for Wednesday evening and Friday afternoon. If you are in town, please stop by. Convention registration will be required.
The talks are entitled, "Model Railroads Go to War" and "USMRR Aquia Line- a Layout Update."
The first talk is a quick survey of railroads at war and how to model them. It parallels my last book with the same title.
The Layout Update is a look at the design, construction, and finished scenes on my O scale home layout. Readers of the blog will be familiar with most of it, but I did take some new photos for the talk.
Tonight, Jim Mackay, director of the Lyceum, Alexandria's History Museum, stopped by to visit the layout(s), and check on progress on the Pioneer Mills model. We discussed the next steps for the project, which include a Pungy style sailing ship and a portion of the locomotive works.
In his hand is the pilot model of Pioneer Mills that I rejected because the windows were too small. He will use it as a pencil holder on his desk. He remarked, "the pilot model looked liked the mill after the fire."
I suggested he add some fireplace ashes to make the effect more convincing. I'm not sure if he will act on that suggestion.
August 19, 2015
Expanding the USMRR Aquia Line
My grandfather had a habit of saying right after dinner, "So what are we eating tomorrow?" At least he waited until after dinner.
Why am I discussing expanding the Aquia Line when I haven't finished the Port of LA Project Layout? I have been updating the talk I will be giving at the Portland NMRA Convention next week. The final part of my layout update talk is about future plans including possible expansion plans for the Aquia Line.
Notice I said "possible," as there are also some other ideas I'd like to try too. But for now, here is a plan that shows the Aquia Line layout expanded to occupy the same benchwork footprint as the PoLA Layout.
There is an immediate implication of this potential expansion. That is, I would not build Burnside's Wharf in the current planned location. Instead, I would just add two stub tracks where the wharf was originally planned, as shown in this expanded plan.
This plan adds a longer run between Aquia Landing and Burnside's Wharf, closer to the actual prototype distance. It also allows for more room to model ships at Burnside's wharf. There is space to display the ironclad Passaic at anchor off shore, perhaps with a tug or gun boat escort. Although I have almost completed the Passaic model, I decided not to place it at the wharf at Aquia Landing. It just doesn't belong there. Being anchored off the shore is a much more logical spot for the ironclad warship.
August 17, 2015
Bird's Eye View of Mormon Island and East Basin
This image from Bing Bird's Eye view shows the area modeled in the PoLA layout. The blue lines are the tracks that the plan includes to one degree or another. The pink lines are not modeled. I had to bend some things around to fit the Vopak loadout into the plan. I also flipped the pierside tracks, shown as dotted blue lines. They are now out of service, but I wanted to include tracks that run along a pier.
Note the BBC Charters break bulk carrier ship at Pasha Stevedores. That ship is very similar to the one I will have on the layout.
This image is a few years old. The Pacific Harbor Line moved the main yard from Pier A, as shown in the photo, to a point just to the left of this image. The former Pier A yard will become an expanded container terminal.
This image illustrates one of the neat things about modeling the modern era. You can research current operations via Bing Maps and Google Earth.
August 16, 2015
My own Alameda Trench?
Mock up of train emerging from the new access to staging. The tracks are not yet installed. |
Using the Kreg jig to add the benchwork supports. |
Armed with a fresh of burst of energy this afternoon, I started the adding the benchwork for the staging connection in the closet. I thought long and hard about whether to use a removable fiddle yard on the right side versus permanent staging in the closet on the left.
The permanent solution won.
That was the easy part. Next was the tough part of building it. I had to cut the holes and build the benchwork in the tight confines under the landing.
I was deep in the construction when Gerry Fitzgerald stopped by for a visit. Gerry's arrival was very handy as he helped with the construction. He also helped me purge a bunch of stuff that was clogging the closet, including about 20-30 railroad VHS tapes. Given that I no longer have a VHS player, it was a no-brainer. Gerry will watch and donate them to charity when he is done with them.
Checking for clearance and level. |
I used the existing shelves in the closet to add the surface for the staging track. A piece of foam on the shelf acts as the staging platform. I may surface it with ¼ inch plywood if it gets abused.
Leveling the curved roadbed that extends through the hole took some work. |
Foam staging shelf |
Gerry examines the track plan |
August 15, 2015
Interior Decorating for the Model Railroader
No, that is not the name of my next book, but today my mom and I got some fabric to make throw cushions for the train layout room. You got to let the interior designer out of the model railroader every now and then. Since this layout is in the media room/crew lounge, we have to make sure our crews are comfy.
Mom will make the throw pillows from this fabric.
Meanwhile, I painted the benchwork with a new color, a light pale yellow, or should I say ecru.
I also cut in the basin for the water area of the layout. Next step is to get the boat cut down at the waterline.
The white slip of paper is a mock of the the three lane Fries Ave grade crossing.
John Drye and his niece, Sara Spencer, stopped by to visit the layout and eat some of mom's meatballs and pasta.
August 12, 2015
Display shelves under the layout
Jochen Mass drove the Rothman's Racing Porsche 956 Number 10 to victory in the 1982 Norisring. |
With room lights off |
One of the objectives of using the IVAR shelves under the layout was to make space to display some of my dioramas, souvenirs from various events, and my modest collection of scale model 1/43rd Porsche cars.
With room lights on. |
My collection started with an attempt to find some models of the cars that I saw when I lived in Germany in the early 1980s. The Jaegermeister 935s and the Rothmans 956's were very successful at that time. So I got a few of them.
Hans Heyer at the helm of Lancia Beta 1 at the Norisring 19 |
I built display racks and added lighting to help illuminate the car models and other objects on the shelves. The lights are GE LED bars that plug-in. They were easy to install, cost about $20 at Home Depot and have a very low profile.
Prior to building this display, I had no real grasp of the collection. Now with it well lit and visible I can see that I need to get more the earlier Porsche race cars, and some of the rally cars. There is room for about another 50 cars, nearly doubling the collection.
I gave the fascia a base coat of light gray paint. It was a color I had on hand. I intended it to be just a primer, but I like it as it matches the gray on the TV stand. I may just keep it. Gluing the fascia to the benchwork turned out very well. I had only three seams to putty and sand, and two screws on the far right to patch. The fascia presents a neat, clean appearance without any screw marks or seams visible.
August 9, 2015
"Wow," is what....
.... Alicia said when she came down and saw the finished benchwork. I think that is a good sign.
The foam and fascia are glued to the frames, so we need to wait at least one day to left the glue cure. Even with the cluttered look of the clamps, weights on the foam, the unpainted fascia, and pink terrain, the basic design comes through.
I am pleased with how the Ivar shelving worked as benchwork support. The open grid benchwork worked well simply screwed to the Ivar legs. A few lag screws into the ledger created a very sturdy structure. The layout is the same height as Aquia Landing, so if I ever decide to expand Aquia Landing, this bench work can be retained.
Because the layout hugs the wall, the room still retains functionality as a crew lounge and media room. We rarely watch TV, but for when we do, this room is not a bad place to watch.
When it comes time to operate the layout, it is a simple matter to slide the couch toward the middle of the room to provide access to the layout.
I reinstalled the Teton Mountain art print above the layout. I generally don't like clutter above layouts, but since I can't do anything about the windows, the art print doesn't look too out of place on the adjoining wall.
I modified the benchwork a bit to accommodate a narrow space between the far right of PoLA and the wharf peninsula of Aquia Landing. I also widened the benchwork at the left side. Those modifications required that I adjust the track plan slightly. I flipped the bulk oil loading facility to the left side, and I reconfigured the Borax factory slightly. See version 7 of the track plan.
The optional removable fiddle track is there in case I decide not to build the staging track in the closet. I am not sold on the idea of the staging in the closet. There are two serious beams to tunnel through to make that work. Hmmmmmm.......
The Backdrops are Up
Backdrop temporarily taped in position |
Are you sure about this? |
We used a balsa wood piece to smooth out the bubbles. |
Lower horizon looks better |
View toward the corner |
After a lovely morning and a long walk, Alicia and I installed the backdrops. I first prepped the wall by patching the small holes from picture holders. Then I touched up the paint.
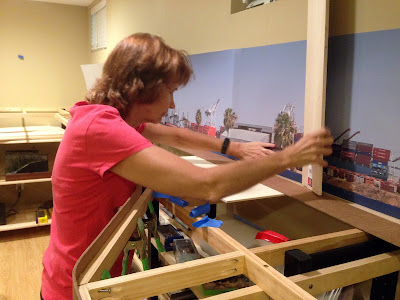
Next we temporarily placed the backdrop with bits of masking tape as the directions that LARC Products suggested. We followed their directions in peeling and rolling. We used temporarily installed pieces of ¼ inch plywood to support the backdrop roll as we installed, that helped hold the roll steady.
Alicia used a long piece of soft balsa wood to help smooth the backdrop material and to remove bubbles, while I did the peeling of the backing and positioning. The first piece went up fast and trouble free. We had a little more trouble getting the second piece installed as it had two corners to negotiate. But we got it to work well by trimming the corners and slightly overlapping the pieces.
Since we installed the back drop over a tan wall, the backdrop appears darker when the white backing was peeled away. In this case it works to our advantage as it hints at the "LA Smog" look. For a pristine mountain scene, I would make sure the underlying surface is white.
We were both impressed with the Fab-Tex material. The strength and forgiveness were very impressive. You can pull it off if you need to reposition.
The instructions say it is a 3-person job, but we did it just us two.
I decided that I made the horizon a bit too high. So I installed the backdrop below grade by one inch. That lowered the horizon to the perfect position.
If I were to do this again, I would make the refinery on the left side a tad smaller.
With the backdrop up, it is time to finish the foam surface and the fascia. I plan to widen the layout on the left. But more on that later.
Thanks to Bill Brown and LARC Products for doing a great job printing my files. I highly recommend this product.
Refinery on left side. I plan to widen the benchwork at the far left. |
August 8, 2015
Bench Work of PoLA Layout
I had to modify the design on the far right as the space between this layout and the ACW layout was tight. |
Parts for the open grid pre-drilled in the backyard |
Kreg Jig in action |
I nearly finished the benchwork for the PoLA layout this afternoon. I built it as a open grid screwed to the top of the Ikea Ivar shelf supports. The construction went pretty quickly. The walls were square, which made things easier. There was a slight slope to the floor, so I had to adjust for that.
I like using a Kreg Jig when building open grid bench work with butt-joined parts. The Kreg Jig makes strong joints as no screws go into end grain. It also makes a neat finished product. I prefabricated the joist outside in the beautiful weather.
Benchwork parts screwed to the wall and the Ikea shelves. |
I first screwed the ledger to the wall. Using the Kreg Jig I could screw the joists to the the ledger from the inside. I built the "ladder" joist by joist and checked to make sure all was square as I went along.
The fascia will be made from 4" hardboard strips.
Test fitting the fascia. The joists over the TV had to be installed on the flat side to allow room. The TV is under the benchwork, but is visible without obstruction from the sofa and chair. |
The corner of the layout will have a curved fascia section. |
Backdrop for Project Layout Arrived
This is the prototype scene we are trying to capture. |
The backdrop prints arrived from LARC Products today. I rolled them out on the family room floor to take a quick look. They came out great.
Later that evening I taped-up one temporarily to the wall to check it out. The scene with the large cranes had me worried as they were a lot of ways that part of the backdrop could not work. The color saturation, perspective and sharpness all could make it look unrealistic. So I did a mock up and I think it worked out nicely.
The backdrop is very sharp. I was a bit worried about that as I used a 150 dpi image (at 57,000 pixels wide it was already over 1.2 GB in size.) The colors are a little unsaturated, which adds an element of distance. That effect is more noticeable in the iPhone shots. In person, the colors look spot on.
I went with their Fab-Tex material because it was removable and reposition-able.
Now to get the backdrop and benchwork installed. Then on to laying some track.
If you are interested in this backdrop, I have granted LARC Products permission to print this backdrop for other users. They plan to add it to their product line.
Backdrop temporarily taped in place with mocked-up benchwork. |
Taking a look at the backdrop on the floor of the family room just after it arrived. |
Another test shot with more distant ships and cranes. |
Subscribe to:
Posts (Atom)