I'm back from Florida and chugging away on the D-Day diorama. While in Florida I painted about 70 infantry, and two DD Sherman tanks that my brother printed. I also printed another LCM on his printer.
 |
| Keith applying gloss to the waves |
On Saturday, Keith Rocco visited to work on the diorama. He first focused on painting the shore line and shingle beach. I thought we needed to make the beach look more realistic with portions of wet sand, pools of water, and receding waves. Keith agreed and did a great job painting it. It looks great.
Next, Keith stated applying gloss polyurethane to the water surface. He managed to get two coats down (later that night I added one more coat. It will need about 8-10 coats in total.) Then he started prepping some of the painted figures by removing their bases before he had to leave.
Meanwhile, I was working on finishing the bunkers and trenches for WN61, the resistance nest on the east side.
Mark Franke stopped by to drop off the tanks and boats he has been working on over the past week. As usual he did a fantastic job. One of the tanks is shown wading in the surf. The crews tried to use the water for cover as it helped reduce their exposed area to enemy fire.
 |
| Mark Franke did a nice job painting a detailing the wading tank |
I installed some trenches in WN61. I had to simplify the trench layout a bit due to the selective compression of the scene. I cut a slot in the foam to make the basic trench. They I prepared some tooth picks and scribed wood siding to make the trench revetments. Installing them was more tedious than I expected. I think I will try a different technique on the next set of trenches. Perhaps I will print some trench sections that I can install.
 |
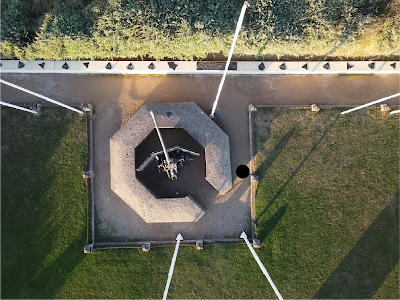
| This aerial photo was perfect for making the 1694 Ringstand and 50mm gun.. |
 |
| 50mm ATG in a Ringstand at WN61 |
The concrete parts of the bunkers are laser cut MDF. The guns are 3D prints that I made from files I bought off the web. I painted the bunkers with various shades to look like relatively new concrete. The guns are dunkel gelb with some dunkel grun camouflage. The R677 casement bunker with the Pak 43 88mm ATG has some chipped concrete that was damaged by US fire as can be seen in prototype photos. I have some camouflage netting that I will add to these later.
I applied a wash of dark brown paint to ground areas that would have vegetation. I used lighter paint to lay out some trails and roads.
Next I used Durhams water putty to shape the tank ditches. I checked with Mike and he suggested that the ditches were just sand without revetments. There are some photos showing ditches like that in the modeled area (see left image.) So that is how I shaped them.
Finally, I added a base coat of some ground foam to the hill area near WN61. This is just the base coat but it does hint at the final appearance.
 |
| Keith mocked up some figures and a tank. We do plan to add LED lights to the burning LCMs. |


No comments:
Post a Comment